
Java Tutorial
तो चलिए आज हम आपको JAVA के बारे में कुछ बताते है ,तो सुरु करते है :-
जावा एक उच्च-स्तरीय प्रोग्रामिंग भाषा है जिसे मूल रूप से सन माइक्रोसिस्टम्स द्वारा विकसित किया गया है और 1995 में जारी किया गया है। जावा विभिन्न प्लेटफार्मों पर चलता है, जैसे कि विंडोज, मैक ओएस और यूनिक्स के विभिन्न संस्करण। यह ट्यूटोरियल जावा की पूरी समझ देता है। यह संदर्भ आपको जावा प्रोग्रामिंग भाषा सीखने के दौरान सरल और व्यावहारिक दृष्टिकोण के माध्यम से ले जाएगा।
Why to Learn java Programming?(जावा प्रोग्रामिंग क्यों सीखें?)
ava छात्रों और काम करने वाले पेशेवरों के लिए एक बेहतरीन सॉफ्टवेयर इंजीनियर बनने के लिए जरूरी है, जब वे सॉफ्टवेयर डेवलपमेंट डोमेन में काम कर रहे होते हैं। मैं जावा प्रोग्रामिंग सीखने के कुछ प्रमुख लाभों की सूची दूंगा:
ऑब्जेक्ट ओरिएंटेड - जावा में, सब कुछ एक ऑब्जेक्ट है। जावा आसानी से बढ़ाया जा सकता है क्योंकि यह ऑब्जेक्ट मॉडल पर आधारित है।
प्लेटफ़ॉर्म इंडिपेंडेंट - सी और सी ++ सहित कई अन्य प्रोग्रामिंग भाषाओं के विपरीत, जब जावा संकलित किया जाता है, तो इसे प्लेटफ़ॉर्म विशिष्ट मशीन में संकलित नहीं किया जाता है, बल्कि प्लेटफ़ॉर्म स्वतंत्र बाइट कोड में। यह बाइट कोड वेब पर वितरित किया जाता है और वर्चुअल मशीन (JVM) द्वारा इसे जिस भी प्लेटफॉर्म पर चलाया जा रहा है, उसकी व्याख्या की जाती है।
सरल - जावा सीखने के लिए आसान होने के लिए डिज़ाइन किया गया है। यदि आप OOP जावा की मूल अवधारणा को समझते हैं, तो मास्टर करना आसान होगा।
सुरक्षित - जावा की सुरक्षित सुविधा के साथ यह वायरस-मुक्त, छेड़छाड़-मुक्त सिस्टम विकसित करने में सक्षम बनाता है। प्रमाणीकरण तकनीक सार्वजनिक कुंजी एन्क्रिप्शन पर आधारित है।
आर्किटेक्चर-न्यूट्रल - जावा कंपाइलर एक आर्किटेक्चर-न्यूट्रल ऑब्जेक्ट फाइल फॉर्मेट उत्पन्न करता है, जो जावा रनटाइम सिस्टम की उपस्थिति के साथ कई प्रोसेसर पर संकलित कोड को निष्पादन योग्य बनाता है।
पोर्टेबल - आर्किटेक्चर-न्यूट्रल होने और स्पेसिफिकेशन के कार्यान्वयन पर निर्भर नहीं होने के कारण जावा को पोर्टेबल बनाता है। जावा में कंपाइलर ANSI C में एक साफ पोर्टेबिलिटी सीमा के साथ लिखा गया है, जो कि POSIX सबसेट है।
मजबूत - जावा मुख्य रूप से संकलन समय त्रुटि जाँच और रनटाइम जाँच पर जोर देकर त्रुटि प्रवण स्थितियों को खत्म करने का प्रयास करता है।
Hello World using Java Programming.(जावा प्रोग्रामिंग का उपयोग करके हैलो वर्ल्ड।)
बस आपको जावा प्रोग्रामिंग के बारे में थोड़ा सा उत्साह देने के लिए, मैं आपको एक छोटा पारंपरिक सी प्रोग्रामिंग हैलो वर्ल्ड कार्यक्रम देने जा रहा हूं, आप इसे डेमो लिंक के माध्यम से आज़मा सकते हैं।
public class MyFirstJavaProgram {

   /* This is my first java program.
    * This will print 'Hello World' as the output
    */

   public static void main(String []args) {
      System.out.println("Hello World"); // prints Hello World
   }
}
Applications of Java Programming(जावा प्रोग्रामिंग के अनुप्रयोग)
जावा मानक संस्करण की नवीनतम रिलीज़ जावा एसई 8 है। जावा की उन्नति और इसकी व्यापक लोकप्रियता के साथ, विभिन्न प्रकार के प्लेटफार्मों के अनुरूप कई कॉन्फ़िगरेशन बनाए गए थे। उदाहरण के लिए: एंटरप्राइज़ एप्लिकेशन के लिए J2EE, मोबाइल एप्लिकेशन के लिए J2ME।
नए J2 संस्करणों को क्रमशः Java SE, Java EE और Java ME नाम दिया गया। जावा को एक बार लिखने, कहीं भी चलाने की गारंटी दी जाती है।
मल्टीथ्रेडेड - जावा के मल्टीथ्रेडेड फीचर के साथ ऐसे प्रोग्राम लिखना संभव है जो एक साथ कई कार्य कर सकते हैं। यह डिज़ाइन सुविधा डेवलपर्स को इंटरैक्टिव अनुप्रयोगों का निर्माण करने की अनुमति देती है जो आसानी से चल सकते हैं।
व्याख्या की गई - जावा बाइट कोड को मूल मशीन निर्देशों के लिए मक्खी पर अनुवादित किया जाता है और इसे कहीं भी संग्रहीत नहीं किया जाता है। लिंकिंग एक वृद्धिशील और हल्के वजन की प्रक्रिया के बाद से विकास प्रक्रिया अधिक तीव्र और विश्लेषणात्मक है।
उच्च प्रदर्शन - जस्ट-इन-टाइम संकलक के उपयोग के साथ, जावा उच्च प्रदर्शन को सक्षम करता है।
वितरित - जावा इंटरनेट के वितरित वातावरण के लिए डिज़ाइन किया गया है।
गतिशील - जावा को C या C ++ की तुलना में अधिक गतिशील माना जाता है क्योंकि इसे एक विकसित वातावरण के अनुकूल बनाया गया है। जावा प्रोग्राम रन-टाइम जानकारी का व्यापक मात्रा में उपयोग कर सकते हैं जो रन-टाइम पर ऑब्जेक्ट्स तक पहुंच को सत्यापित करने और हल करने के लिए उपयोग किया जा सकता है।
Audience(दर्शक):-
इस ट्यूटोरियल को शुरुआती लोगों के लिए तैयार किया गया है ताकि वे जावा प्रोग्रामिंग भाषा से संबंधित उन्नत अवधारणाओं को बुनियादी समझने में मदद कर सकें।
Prerequisites(आवश्यक शर्तें)
इससे पहले कि आप इस संदर्भ में दिए गए विभिन्न प्रकार के उदाहरणों का अभ्यास करना शुरू करें, हम मानते हैं कि आप पहले से ही कंप्यूटर प्रोग्राम और कंप्यूटर प्रोग्रामिंग भाषाओं के बारे में जानते हैं।
जावा प्रोग्रामिंग भाषा मूल रूप से सन माइक्रोसिस्टम्स द्वारा विकसित की गई थी जिसे जेम्स गोसलिंग द्वारा शुरू किया गया था और 1995 में सन माइक्रोसिस्टम्स के जावा प्लेटफॉर्म (जावा 1.0 [J2SE]) के मुख्य घटक के रूप में जारी किया गया था।
जावा मानक संस्करण की नवीनतम रिलीज़ जावा एसई 8 है। जावा की उन्नति और इसकी व्यापक लोकप्रियता के साथ, विभिन्न प्रकार के प्लेटफार्मों के अनुरूप कई कॉन्फ़िगरेशन बनाए गए थे। उदाहरण के लिए: एंटरप्राइज़ एप्लिकेशन के लिए J2EE, मोबाइल एप्लिकेशन के लिए J2ME।
नए J2 संस्करणों को क्रमशः Java SE, Java EE और Java ME नाम दिया गया। जावा को एक बार लिखने, कहीं भी चलाने की गारंटी दी जाती है।
Java is −
जावा है -
ऑब्जेक्ट ओरिएंटेड - जावा में, सब कुछ एक ऑब्जेक्ट है। जावा आसानी से बढ़ाया जा सकता है क्योंकि यह ऑब्जेक्ट मॉडल पर आधारित है।
प्लेटफ़ॉर्म इंडिपेंडेंट - सी और सी ++ सहित कई अन्य प्रोग्रामिंग भाषाओं के विपरीत, जब जावा संकलित किया जाता है, तो इसे प्लेटफ़ॉर्म विशिष्ट मशीन में संकलित नहीं किया जाता है, बल्कि प्लेटफ़ॉर्म स्वतंत्र बाइट कोड में। यह बाइट कोड वेब पर वितरित किया जाता है और वर्चुअल मशीन (JVM) द्वारा इसे जिस भी प्लेटफॉर्म पर चलाया जा रहा है, उसकी व्याख्या की जाती है।
सरल - जावा सीखने के लिए आसान होने के लिए डिज़ाइन किया गया है। यदि आप OOP जावा की मूल अवधारणा को समझते हैं, तो मास्टर करना आसान होगा।
सुरक्षित - जावा की सुरक्षित सुविधा के साथ यह वायरस-मुक्त, छेड़छाड़-मुक्त सिस्टम विकसित करने में सक्षम बनाता है। प्रमाणीकरण तकनीक सार्वजनिक कुंजी एन्क्रिप्शन पर आधारित है।
आर्किटेक्चर-न्यूट्रल - जावा कंपाइलर एक आर्किटेक्चर-न्यूट्रल ऑब्जेक्ट फाइल फॉर्मेट उत्पन्न करता है, जो जावा रनटाइम सिस्टम की उपस्थिति के साथ कई प्रोसेसर पर संकलित कोड को निष्पादन योग्य बनाता है।
पोर्टेबल - आर्किटेक्चर-न्यूट्रल होने और स्पेसिफिकेशन के कार्यान्वयन पर निर्भर नहीं होने के कारण जावा को पोर्टेबल बनाता है। जावा में कंपाइलर ANSI C में एक साफ पोर्टेबिलिटी सीमा के साथ लिखा गया है, जो कि POSIX सबसेट है।
मजबूत - जावा मुख्य रूप से संकलन समय त्रुटि जाँच और रनटाइम जाँच पर जोर देकर त्रुटि प्रवण स्थितियों को खत्म करने का प्रयास करता है।
मल्टीथ्रेडेड - जावा के मल्टीथ्रेडेड फीचर के साथ ऐसे प्रोग्राम लिखना संभव है जो एक साथ कई कार्य कर सकते हैं। यह डिज़ाइन सुविधा डेवलपर्स को इंटरैक्टिव अनुप्रयोगों का निर्माण करने की अनुमति देती है जो आसानी से चल सकते हैं।
व्याख्या की गई - जावा बाइट कोड को मूल मशीन निर्देशों के लिए मक्खी पर अनुवादित किया जाता है और इसे कहीं भी संग्रहीत नहीं किया जाता है। लिंकिंग एक वृद्धिशील और हल्के वजन की प्रक्रिया के बाद से विकास प्रक्रिया अधिक तीव्र और विश्लेषणात्मक है।
उच्च प्रदर्शन - जस्ट-इन-टाइम संकलक के उपयोग के साथ, जावा उच्च प्रदर्शन को सक्षम करता है।
वितरित - जावा इंटरनेट के वितरित वातावरण के लिए डिज़ाइन किया गया है।
गतिशील - जावा को C या C ++ की तुलना में अधिक गतिशील माना जाता है क्योंकि इसे एक विकसित वातावरण के अनुकूल बनाया गया है। जावा प्रोग्राम रन-टाइम जानकारी का व्यापक मात्रा में उपयोग कर सकते हैं जो रन-टाइम पर ऑब्जेक्ट्स तक पहुंच को सत्यापित करने और हल करने के लिए उपयोग किया जा सकता है।
History of Java(जावा का इतिहास)
जेम्स गोस्लिंग ने जून 1991 में अपनी कई सेट-टॉप बॉक्स परियोजनाओं में से एक में उपयोग के लिए जावा भाषा परियोजना शुरू की। भाषा, जिसे शुरू में stood ओक ’कहा जाता था, एक ओक के पेड़ के बाद, जो गोसलिंग के कार्यालय के बाहर खड़ा था, जिसे up ग्रीन’ नाम से भी जाना जाता था और बाद में जावा को यादृच्छिक शब्दों की सूची से नाम दिया गया।
सन ने 1995 में जावा 1.0 के रूप में पहला सार्वजनिक कार्यान्वयन जारी किया। इसने लोकप्रिय प्लेटफ़ॉर्म पर नो-कॉस्ट रन-टाइम प्रदान करते हुए राइट वन्स, रन एनीवेयर (WORA) का वादा किया।
13 नवंबर, 2006 को, Sun ने GNU जनरल पब्लिक लाइसेंस (GPL) की शर्तों के तहत मुक्त और ओपन सोर्स सॉफ़्टवेयर के रूप में जावा का अधिकांश भाग जारी किया।
8 मई, 2007 को, सन ने इस प्रक्रिया को समाप्त कर दिया, जिससे सभी जावा के कोर कोड को स्वतंत्र और ओपन-सोर्स बना दिया, जो कोड के एक छोटे से हिस्से से अलग हो गया, जिसमें सूर्य ने कॉपीराइट नहीं रखा था।
Tools You Will Need(उपकरण आप की आवश्यकता होगी)
इस ट्यूटोरियल में चर्चा की गई उदाहरणों के प्रदर्शन के लिए, आपको न्यूनतम 64 एमबी रैम (128 एमबी रैम अनुशंसित) के साथ एक पेंटियम 200-मेगाहर्ट्ज कंप्यूटर की आवश्यकता होगी।
आपको निम्न सॉफ्टवेयर्स की भी आवश्यकता होगी -
लिनक्स 7.1 या विंडोज एक्सपी / 7/8 ऑपरेटिंग सिस्टम
जावा JDK 8
Microsoft नोटपैड या कोई अन्य टेक्स्ट एडिटर
यह ट्यूटोरियल जावा का उपयोग करके जीयूआई, नेटवर्किंग और वेब एप्लिकेशन बनाने के लिए आवश्यक कौशल प्रदान करेगा।
हम आपको JDK FILE की LINK दे रहा हु आप यह से DOWNDLOAD कर सकते।
Local Environment Setup(स्थानीय पर्यावरण सेटअप)
यदि आप अभी भी जावा प्रोग्रामिंग भाषा के लिए अपना वातावरण सेट करने के लिए तैयार हैं, तो यह अनुभाग आपको गाइड करता है कि कैसे जावा को अपनी मशीन पर डाउनलोड और सेट किया जाए। पर्यावरण को स्थापित करने के लिए निम्नलिखित कदम हैं।
जावा एसई डाउनलोड जावा से लिंक से स्वतंत्र रूप से उपलब्ध है। आप अपने ऑपरेटिंग सिस्टम के आधार पर एक संस्करण डाउनलोड कर सकते हैं।
जावा डाउनलोड करने और अपनी मशीन पर जावा स्थापित करने के लिए .exe चलाने के लिए निर्देशों का पालन करें। एक बार जब आपने अपनी मशीन पर जावा स्थापित कर लिया, तो आपको इंस्टॉलेशन निर्देशिकाओं को सही करने के लिए पर्यावरण चर सेट करना होगा -
विंडोज के लिए पथ की स्थापना
मान लें कि आपने c: \ Program Files \ java \ jdk निर्देशिका में Java स्थापित किया है -
'मेरा कंप्यूटर' पर राइट-क्लिक करें और 'गुण' चुनें।
'उन्नत' टैब के अंतर्गत 'पर्यावरण चर' बटन पर क्लिक करें।
अब, 'Path' वैरिएबल को बदल दें ताकि इसमें जावा एक्जीक्यूटेबल का भी पथ शामिल हो। उदाहरण के लिए, यदि पथ वर्तमान में 'C: \ WINDOWS \ SYSTEM32' पर सेट है, तो 'C: \ WINDOWS \ SYSTEM32; c: \ Program Files \ java \ jdk \ bin' पढ़ने के लिए अपना पथ परिवर्तित करें।
लिनक्स, यूनिक्स, सोलारिस, फ्रीबीएसडी के लिए पथ की स्थापना
जावा चर को स्थापित करने के लिए पर्यावरण चर पथ को सेट किया जाना चाहिए। यदि आपको ऐसा करने में परेशानी होती है, तो अपने शेल दस्तावेज़ देखें।
उदाहरण, यदि आप अपने शेल के रूप में बैश का उपयोग करते हैं, तो आप अपने '.bashrc:' के अंत में निम्नलिखित पंक्ति जोड़ देंगे: पथ / = पथ / से / जावा: $ पथ
Popular Java Editors(लोकप्रिय जावा संपादक)
अपने जावा प्रोग्राम लिखने के लिए, आपको एक टेक्स्ट एडिटर की आवश्यकता होगी। बाजार में और भी अधिक परिष्कृत IDE उपलब्ध हैं। लेकिन अभी के लिए, आप निम्नलिखित में से एक पर विचार कर सकते हैं -
नोटपैड - विंडोज मशीन पर, आप नोटपैड (इस ट्यूटोरियल के लिए अनुशंसित), टेक्स्टपैड जैसे किसी भी सरल पाठ संपादक का उपयोग कर सकते हैं।
Netbeans - एक Java IDE जो ओपन-सोर्स और फ्री है जिसे https://www.netbeans.org/index.html से डाउनलोड किया जा सकता है।
ग्रहण - एक जावा आईडीई जो कि ग्रहण मुक्त-स्रोत समुदाय द्वारा विकसित किया गया है और इसे https://www.eclipse.org/ से डाउनलोड किया जा सकता है।
What is Next?(आगे क्या है?)
अगला अध्याय आपको सिखाएगा कि अपने पहले जावा कार्यक्रम को कैसे लिखना और चलाना है और विकासशील अनुप्रयोगों के लिए जावा में कुछ महत्वपूर्ण बुनियादी वाक्यविन्यासों की आवश्यकता है।
जब हम एक जावा प्रोग्राम पर विचार करते हैं, तो इसे वस्तुओं के संग्रह के रूप में परिभाषित किया जा सकता है जो एक दूसरे के तरीकों को लागू करने के माध्यम से संवाद करते हैं। आइए अब संक्षेप में देखते हैं कि कक्षा, वस्तु, विधियाँ और उदाहरण चर क्या हैं।
वस्तु - वस्तुओं में अवस्थाएँ और व्यवहार होते हैं। उदाहरण: एक कुत्ते में राज्य होते हैं - रंग, नाम, नस्ल के साथ-साथ व्यवहार जैसे कि उनकी पूंछ को भौंकना, भौंकना, खाना। एक वस्तु एक वर्ग का एक उदाहरण है।
वर्ग - एक वर्ग को एक टेम्पलेट / खाका के रूप में परिभाषित किया जा सकता है जो उस व्यवहार / स्थिति का वर्णन करता है जो उसके प्रकार का उद्देश्य समर्थन करता है।
विधियाँ - एक विधि मूल रूप से एक व्यवहार है। एक क्लास में कई तरीके हो सकते हैं। यह उन तरीकों में है जहां लॉजिक्स लिखा जाता है, डेटा में हेरफेर किया जाता है और सभी कार्यों को निष्पादित किया जाता है।
इंस्टेंस वेरिएबल्स - प्रत्येक ऑब्जेक्ट के उदाहरण वेरिएबल्स का एक अनूठा सेट होता है। ऑब्जेक्ट का राज्य इन उदाहरण चर के लिए दिए गए मानों द्वारा बनाया जाता है।
First Java Program
आइए हम एक सरल कोड देखें जो हैलो वर्ल्ड शब्द को प्रिंट करेगा।
Example
public class MyFirstJavaProgram {

   /* This is my first java program.
    * This will print 'Hello World' as the output
    */

   public static void main(String []args) {
      System.out.println("Hello World"); // prints Hello World
   }
}
आइए देखें कि फ़ाइल को कैसे बचाया जाए, संकलन करें और प्रोग्राम को कैसे चलाएं। कृपया बाद के चरणों का पालन करें -
नोटपैड खोलें और ऊपर के रूप में कोड जोड़ें।
फ़ाइल को इस रूप में सहेजें: MyFirstJavaProgram.java।
एक कमांड प्रॉम्प्ट विंडो खोलें और उस निर्देशिका पर जाएं जहां आपने कक्षा को बचाया था। मान लें कि यह C: \ है।
'Javac MyFirstJavaProgram.java' टाइप करें और अपना कोड संकलित करने के लिए एंटर दबाएँ। यदि आपके कोड में कोई त्रुटि नहीं है, तो कमांड प्रॉम्प्ट आपको अगली पंक्ति में ले जाएगा (मान लें: पथ चर सेट है)।
अब, अपना प्रोग्राम चलाने के लिए 'java MyFirstJavaProgram' टाइप करें।
आप 'हैलो वर्ल्ड' को विंडो पर प्रिंट करके देख पाएंगे।
Output
C:\> javac MyFirstJavaProgram.java
C:\> java MyFirstJavaProgram
Hello World
Basic Syntax
जावा कार्यक्रमों के बारे में, निम्नलिखित बातों को ध्यान में रखना बहुत महत्वपूर्ण है।
केस सेंसिटिविटी - जावा केस सेंसिटिव है, जिसका अर्थ है पहचानकर्ता हैलो और हैलो का जावा में अलग अर्थ होगा।
कक्षा के नाम - सभी वर्ग नामों के लिए पहला पत्र ऊपरी मामले में होना चाहिए। यदि कक्षा के नाम को बनाने के लिए कई शब्दों का उपयोग किया जाता है, तो प्रत्येक आंतरिक शब्द का पहला अक्षर ऊपरी मामले में होना चाहिए।
उदाहरण: वर्ग MyFirstJavaClass
विधि के नाम - सभी विधि के नाम लोअर केस अक्षर से शुरू होने चाहिए। यदि विधि के नाम को बनाने के लिए कई शब्दों का उपयोग किया जाता है, तो प्रत्येक आंतरिक शब्द का पहला अक्षर ऊपरी मामले में होना चाहिए।
उदाहरण: सार्वजनिक शून्य myMododName ()
प्रोग्राम फ़ाइल नाम - प्रोग्राम फ़ाइल का नाम कक्षा के नाम से बिल्कुल मेल खाना चाहिए।
फ़ाइल को सहेजते समय, आपको इसे वर्ग नाम (याद रखें जावा संवेदनशील है) का उपयोग करके इसे सहेजना चाहिए और नाम के अंत में '। जावा' जोड़ें (यदि फ़ाइल का नाम और वर्ग का नाम मेल नहीं खाते हैं, तो आपका कार्यक्रम संकलित नहीं होगा। )।
लेकिन कृपया ध्यान दें कि यदि आपके पास फ़ाइल में एक सार्वजनिक वर्ग मौजूद नहीं है तो फ़ाइल का नाम वर्ग के नाम से भिन्न हो सकता है। फाइल में पब्लिक क्लास होना भी अनिवार्य नहीं है।
उदाहरण: मान लें कि 'MyFirstJavaProgram' वर्ग का नाम है। तब फ़ाइल को 'MyFirstJavaProgram.java' के रूप में सहेजा जाना चाहिए
सार्वजनिक स्थैतिक शून्य मुख्य (स्ट्रिंग args []) - जावा प्रोग्राम प्रोसेसिंग मुख्य () विधि से शुरू होती है जो हर जावा प्रोग्राम का एक अनिवार्य हिस्सा है।
Java Identifiers
सभी जावा घटकों के नाम की आवश्यकता है। कक्षाओं, चर और विधियों के लिए उपयोग किए जाने वाले नामों को पहचानकर्ता कहा जाता है।
जावा में, पहचानकर्ताओं के बारे में याद रखने के लिए कई बिंदु हैं। वे इस प्रकार हैं -
सभी पहचानकर्ताओं को एक अक्षर (ए से जेड या ए टू जेड), मुद्रा चरित्र ($) या एक अंडरस्कोर (_) से शुरू होना चाहिए।
पहले चरित्र के बाद, पहचानकर्ताओं के पास पात्रों का कोई संयोजन हो सकता है।
एक प्रमुख शब्द का उपयोग पहचानकर्ता के रूप में नहीं किया जा सकता है।
सबसे महत्वपूर्ण बात, पहचानकर्ता संवेदनशील होते हैं।
कानूनी पहचानकर्ताओं के उदाहरण: आयु, $ वेतन, _value, __1_value।
अवैध पहचानकर्ताओं के उदाहरण: 123abc, -salary।
Java Modifiers
अन्य भाषाओं की तरह, संशोधक का उपयोग करके कक्षाओं, विधियों आदि को संशोधित करना संभव है। संशोधक की दो श्रेणियां हैं -
एक्सेस संशोधक - डिफ़ॉल्ट, सार्वजनिक, संरक्षित, निजी
गैर-पहुंच वाले संशोधक - अंतिम, सार, सख्त
हम अगले खंड में संशोधक के बारे में अधिक जानकारी देख रहे हैं।
जावा चर
जावा में चर के प्रकार निम्नलिखित हैं -
स्थानीय चर
वर्ग चर (स्थैतिक चर)
उदाहरण चर (गैर-स्थिर चर)
Java Arrays
Arrays ऐसी वस्तुएँ हैं जो एक ही प्रकार के कई चर संग्रहित करती हैं। हालाँकि, एक सरणी ही ढेर पर एक वस्तु है। हम आगामी अध्यायों में घोषणा करने, निर्माण और आरंभ करने के तरीके पर गौर करेंगे।
Java Enums
Enums जावा 5.0 में पेश किए गए थे। Enums केवल कुछ पूर्वनिर्धारित मूल्यों में से एक होने के लिए एक चर को प्रतिबंधित करते हैं। इस प्रगणित सूची के मूल्यों को एनम कहा जाता है।
Enums के उपयोग से आपके कोड में बगों की संख्या को कम करना संभव है।
उदाहरण के लिए, यदि हम एक ताजा रस की दुकान के लिए एक आवेदन पर विचार करते हैं, तो कांच के आकार को छोटे, मध्यम और बड़े तक सीमित करना संभव होगा। यह सुनिश्चित करेगा कि यह किसी को भी छोटे, मध्यम या बड़े के अलावा किसी भी आकार का ऑर्डर करने की अनुमति नहीं देगा।
Example
class FreshJuice {
   enum FreshJuiceSize{ SMALL, MEDIUM, LARGE }
   FreshJuiceSize size;
}

public class FreshJuiceTest {

   public static void main(String args[]) {
      FreshJuice juice = new FreshJuice();
      juice.size = FreshJuice.FreshJuiceSize.MEDIUM ;
      System.out.println("Size: " + juice.size);
   }
}
उपरोक्त उदाहरण निम्नलिखित परिणाम देगा -
Output
Size: MEDIUM
नोट - एनमों को अपनी या किसी कक्षा के अंदर घोषित किया जा सकता है। तरीकों, चर, कंस्ट्रक्टरों को एनम के अंदर भी परिभाषित किया जा सकता है।
Java Keywords
निम्नलिखित सूची जावा में आरक्षित शब्दों को दर्शाती है। ये आरक्षित शब्द निरंतर या परिवर्तनशील या किसी अन्य पहचानकर्ता नाम के रूप में उपयोग नहीं किए जा सकते हैं।
| abstract | assert | boolean | break |
| byte | case | catch | char |
| class | const | continue | default |
| do | double | else | enum |
| extends | final | finally | float |
| for | goto | if | implements |
| import | instanceof | int | interface |
| long | native | new | package |
| private | protected | public | return |
| short | static | strictfp | super |
| switch | synchronized | this | throw |
| throws | transient | try | void |
| volatile | while |
Comments in Java
जावा सिंगल-लाइन और मल्टी-लाइन टिप्पणियों का समर्थन करता है जो सी और सी ++ के समान हैं। किसी भी टिप्पणी के अंदर उपलब्ध सभी पात्रों को जावा संकलक द्वारा अनदेखा किया जाता है।
Example
public class MyFirstJavaProgram {

   /* This is my first java program.
    * This will print 'Hello World' as the output
    * This is an example of multi-line comments.
    */

   public static void main(String []args) {
      // This is an example of single line comment
      /* This is also an example of single line comment. */
      System.out.println("Hello World");
   }
}
Output
Hello World
Using Blank Lines
एक लाइन जिसमें केवल सफेद स्थान होता है, संभवतः एक टिप्पणी के साथ, एक रिक्त रेखा के रूप में जाना जाता है, और जावा इसे पूरी तरह से अनदेखा करता है।
Inheritance(विरासत)
जावा में, कक्षाएं कक्षाओं से प्राप्त की जा सकती हैं। मूल रूप से, यदि आपको एक नया वर्ग बनाने की आवश्यकता है और यहां पहले से ही एक वर्ग है जिसमें आपके पास कुछ कोड हैं, तो आपके नए वर्ग को पहले से मौजूद कोड से प्राप्त करना संभव है।
यह अवधारणा आपको एक नए वर्ग में कोड को फिर से लिखने के बिना मौजूदा वर्ग के क्षेत्रों और विधियों का पुन: उपयोग करने की अनुमति देती है। इस परिदृश्य में, मौजूदा वर्ग को सुपरक्लास कहा जाता है और व्युत्पन्न वर्ग को उपवर्ग कहा जाता है।
Interfaces(इंटरफेस)
जावा भाषा में, एक इंटरफ़ेस को एक दूसरे के साथ संवाद करने के तरीके पर वस्तुओं के बीच एक अनुबंध के रूप में परिभाषित किया जा सकता है। जब वंशानुक्रम की अवधारणा की बात आती है तो इंटरफेस एक महत्वपूर्ण भूमिका निभाता है।
एक इंटरफ़ेस विधियों को परिभाषित करता है, एक व्युत्पन्न वर्ग (उपवर्ग) का उपयोग करना चाहिए। लेकिन विधियों का कार्यान्वयन पूरी तरह से उपवर्ग तक है।
जावा एक ऑब्जेक्ट-ओरिएंटेड भाषा है। ऑब्जेक्ट-ओरिएंटेड सुविधा वाली भाषा के रूप में, जावा निम्नलिखित मूलभूत अवधारणाओं का समर्थन करता है -
बहुरूपता
विरासत
encapsulation
मतिहीनता
कक्षाएं
वस्तुओं
उदाहरण
तरीका
संदेश देना
इस अध्याय में, हम अवधारणाओं - कक्षाओं और वस्तुओं पर ध्यान देंगे।
वस्तु - वस्तुओं में अवस्थाएँ और व्यवहार होते हैं। उदाहरण: एक कुत्ते के पास राज्य है - रंग, नाम, नस्ल के साथ-साथ व्यवहार - पूंछ को छेड़ना, भौंकना, खाना। एक वस्तु एक वर्ग का एक उदाहरण है।
वर्ग - एक वर्ग को एक टेम्पलेट / ब्लूप्रिंट के रूप में परिभाषित किया जा सकता है जो उस व्यवहार / स्थिति का वर्णन करता है जो उसके प्रकार के समर्थन का उद्देश्य है।
Objects in Java
आइए अब हम गहराई से देखते हैं कि वस्तुएं क्या हैं। यदि हम वास्तविक दुनिया पर विचार करते हैं, तो हम अपने आस-पास कई वस्तुओं, कारों, कुत्तों, मनुष्यों आदि को पा सकते हैं। इन सभी वस्तुओं में एक अवस्था और एक व्यवहार होता है।
यदि हम एक कुत्ते पर विचार करते हैं, तो उसकी स्थिति है - नाम, नस्ल, रंग, और व्यवहार है - भौंकना, पूंछ को छेड़ना, दौड़ना।
यदि आप सॉफ़्टवेयर ऑब्जेक्ट की वास्तविक दुनिया ऑब्जेक्ट के साथ तुलना करते हैं, तो उनके पास बहुत समान विशेषताएं हैं।
सॉफ्टवेयर ऑब्जेक्ट में एक स्थिति और एक व्यवहार भी होता है। सॉफ़्टवेयर ऑब्जेक्ट की स्थिति को फ़ील्ड में संग्रहीत किया जाता है और व्यवहार विधियों के माध्यम से दिखाया जाता है।
तो सॉफ्टवेयर विकास में, विधियाँ किसी वस्तु की आंतरिक स्थिति पर काम करती हैं और ऑब्जेक्ट-टू-ऑब्जेक्ट संचार विधियों के माध्यम से किया जाता है।
जावा में कक्षाएं
एक वर्ग एक खाका है जिसमें से व्यक्तिगत वस्तुएं बनाई जाती हैं।
निम्नलिखित एक वर्ग का एक नमूना है।
Example
public class Dog {
   String breed;
   int age;
   String color;

   void barking() {
   }

   void hungry() {
   }

   void sleeping() {
   }
}
एक वर्ग में निम्न चर प्रकार हो सकते हैं।
स्थानीय चर - चर, विधियां या ब्लॉक के अंदर परिभाषित चर स्थानीय चर कहलाते हैं। चर घोषित किया जाएगा और विधि के भीतर शुरू किया जाएगा और चर पूरा हो जाएगा जब विधि पूरी हो गई है।
इंस्टेंस वैरिएबल - इंस्टेंस वैरिएबल एक वर्ग के भीतर लेकिन किसी भी विधि के बाहर चर रहे हैं। इन चर का आरंम्भ तब किया जाता है जब कक्षा को त्वरित किया जाता है। इंस्टेंस चर किसी भी विधि, रचनाकार या उस विशेष वर्ग के ब्लॉक के अंदर से पहुँचा जा सकता है।
वर्ग चर - वर्ग चर किसी भी विधि के बाहर, स्थिर खोजशब्द के साथ, वर्ग के भीतर घोषित चर हैं।
एक वर्ग के पास विभिन्न प्रकार के तरीकों के मूल्य तक पहुंचने के लिए किसी भी तरीके की संख्या हो सकती है। उपरोक्त उदाहरण में, भौंकना (), भूख () और नींद () विधियां हैं।
जावा भाषा की कक्षाओं को देखते समय कुछ महत्वपूर्ण विषयों पर चर्चा की जानी आवश्यक है।
Constructors(कंस्ट्रक्टर्स)
कक्षाओं के बारे में चर्चा करते समय, सबसे महत्वपूर्ण उप विषय में से एक निर्माता होगा। हर वर्ग का एक रचनाकार होता है। यदि हम स्पष्ट रूप से एक क्लास के लिए कंस्ट्रक्टर नहीं लिखते हैं, तो जावा कंपाइलर उस क्लास के लिए डिफॉल्ट कंस्ट्रक्टर बनाता है।
हर बार एक नई वस्तु बनाई जाती है, कम से कम एक निर्माणकर्ता को आमंत्रित किया जाएगा। कंस्ट्रक्टरों का मुख्य नियम यह है कि उनका वर्ग के समान नाम होना चाहिए। एक वर्ग में एक से अधिक निर्माता हो सकते हैं।
निम्नलिखित एक निर्माता का एक उदाहरण है -
Example
public class Puppy {
   public Puppy() {
   }

   public Puppy(String name) {
      // This constructor has one parameter, name.
   }
}
जावा, सिंगलटन क्लासेस को भी सपोर्ट करता है जहाँ आप एक क्लास का केवल एक ही उदाहरण बना पाएंगे।
नोट - हमारे पास दो अलग-अलग प्रकार के निर्माता हैं। हम बाद के अध्यायों में विस्तार से चर्चा करने जा रहे हैं
Creating an Object
जैसा कि पहले उल्लेख किया गया है, एक वर्ग वस्तुओं के लिए ब्लूप्रिंट प्रदान करता है। तो मूल रूप से, एक वर्ग से एक वस्तु बनाई जाती है। जावा में, नए कीवर्ड का उपयोग नई वस्तुओं को बनाने के लिए किया जाता है।
कक्षा से एक वस्तु बनाते समय तीन चरण होते हैं -
घोषणा - एक वस्तु प्रकार के साथ एक चर नाम के साथ एक चर घोषणा।
तात्कालिकता - 'नया' कीवर्ड का उपयोग ऑब्जेक्ट बनाने के लिए किया जाता है।
आरम्भिक - निर्माण के लिए एक कॉल के बाद 'नया' कीवर्ड आता है। यह कॉल नई ऑब्जेक्ट को इनिशियलाइज़ करता है।
निम्नलिखित एक वस्तु बनाने का एक उदाहरण है -
Example
public class Puppy {
   public Puppy(String name) {
      // This constructor has one parameter, name.
      System.out.println("Passed Name is :" + name );
   }

   public static void main(String []args) {
      // Following statement would create an object myPuppy
      Puppy myPuppy = new Puppy( "tommy" );
   }
}
यदि हम उपरोक्त कार्यक्रम को संकलित और चलाते हैं, तो यह निम्नलिखित परिणाम देगा -
Output
Passed Name is :tommy
Accessing Instance Variables and Methods(एक्सेसिंग चर और तरीके)
इंस्टेंस वेरिएबल्स और तरीकों को निर्मित वस्तुओं के माध्यम से एक्सेस किया जाता है। एक उदाहरण चर का उपयोग करने के लिए, निम्नलिखित पूरी तरह से योग्य पथ है -
/* First create an object */
ObjectReference = new Constructor();

/* Now call a variable as follows */
ObjectReference.variableName;

/* Now you can call a class method as follows */
ObjectReference.MethodName();
Example
यह उदाहरण बताता है कि किसी वर्ग के उदाहरण चर और तरीकों का उपयोग कैसे करें।
public class Puppy {
   int puppyAge;

   public Puppy(String name) {
      // This constructor has one parameter, name.
      System.out.println("Name chosen is :" + name );
   }

   public void setAge( int age ) {
      puppyAge = age;
   }

   public int getAge( ) {
      System.out.println("Puppy's age is :" + puppyAge );
      return puppyAge;
   }

   public static void main(String []args) {
      /* Object creation */
      Puppy myPuppy = new Puppy( "tommy" );

      /* Call class method to set puppy's age */
      myPuppy.setAge( 2 );

      /* Call another class method to get puppy's age */
      myPuppy.getAge( );

      /* You can access instance variable as follows as well */
      System.out.println("Variable Value :" + myPuppy.puppyAge );
   }
}
Output
Name chosen is :tommy
Puppy's age is :2
Variable Value :2
स्रोत फ़ाइल घोषणा नियम
इस खंड के अंतिम भाग के रूप में, आइए अब स्रोत फ़ाइल घोषणा नियमों पर ध्यान दें। एक स्रोत फ़ाइल में कक्षाएं, आयात विवरण और पैकेज स्टेटमेंट की घोषणा करते समय ये नियम आवश्यक हैं।
प्रति स्रोत फ़ाइल में केवल एक सार्वजनिक वर्ग हो सकता है।
एक स्रोत फ़ाइल में कई गैर-सार्वजनिक वर्ग हो सकते हैं।
सार्वजनिक श्रेणी का नाम स्रोत फ़ाइल का नाम होना चाहिए, जिसे अंत में .java द्वारा जोड़ा जाना चाहिए। उदाहरण के लिए: वर्ग का नाम सार्वजनिक वर्ग कर्मचारी {} है तो स्रोत फ़ाइल Employee.java के रूप में होनी चाहिए।
यदि क्लास को पैकेज के अंदर परिभाषित किया गया है, तो पैकेज स्टेटमेंट स्रोत फ़ाइल में पहला स्टेटमेंट होना चाहिए।
यदि आयात स्टेटमेंट मौजूद हैं, तो उन्हें पैकेज स्टेटमेंट और क्लास डिक्लेरेशन के बीच लिखा जाना चाहिए। यदि कोई पैकेज स्टेटमेंट नहीं हैं, तो आयात स्टेटमेंट स्रोत फ़ाइल में पहली पंक्ति होनी चाहिए।
आयात और पैकेज विवरण स्रोत फ़ाइल में मौजूद सभी वर्गों के लिए लागू होंगे। स्रोत फ़ाइल में विभिन्न वर्गों के लिए अलग-अलग आयात और / या पैकेज विवरणों को घोषित करना संभव नहीं है।
कक्षाओं में कई पहुंच स्तर होते हैं और विभिन्न प्रकार की कक्षाएं होती हैं; अमूर्त कक्षाएं, अंतिम कक्षाएं, आदि हम एक्सेस मॉडिफायर अध्याय में इन सभी के बारे में बताएंगे।
उपर्युक्त प्रकार की कक्षाओं के अलावा, जावा में कुछ विशेष कक्षाएं भी हैं जिन्हें इनर क्लासेस और एनोनिमस क्लासेस कहा जाता है।
जावा पैकेज
सरल शब्दों में, यह वर्गों और इंटरफेस को वर्गीकृत करने का एक तरीका है। जावा में एप्लिकेशन विकसित करते समय, सैकड़ों कक्षाएं और इंटरफेस लिखे जाएंगे, इसलिए इन कक्षाओं को वर्गीकृत करना बहुत जरूरी है और साथ ही जीवन को बहुत आसान बनाता है।
आयात विवरण
जावा में अगर एक पूरी तरह से योग्य नाम, जिसमें पैकेज शामिल है और वर्ग का नाम दिया गया है, तो संकलक आसानी से स्रोत कोड या कक्षाएं ढूँढ सकता है। आयात विवरण संकलक को उस विशेष वर्ग को खोजने के लिए उचित स्थान देने का एक तरीका है।
उदाहरण के लिए, निम्नलिखित पंक्ति कंपाइलर से डायरेक्टरी java_installation / java / io में उपलब्ध सभी वर्गों को लोड करने के लिए कहेगी -
import java.io.*;
A Simple Case Study
हमारे मामले के अध्ययन के लिए, हम दो कक्षाएं बनाएंगे। वे कर्मचारी और कर्मचारी हैं।
पहले नोटपैड खोलें और निम्नलिखित कोड जोड़ें। याद रखें यह कर्मचारी वर्ग है और वर्ग एक सार्वजनिक वर्ग है। अब, इस स्रोत फ़ाइल को Employee.java नाम से सहेजें।
कर्मचारी वर्ग के चार उदाहरण चर हैं - नाम, आयु, पदनाम और वेतन। कक्षा में एक स्पष्ट रूप से परिभाषित कंस्ट्रक्टर है, जो एक पैरामीटर लेता है।
Example
import java.io.*;
public class Employee {

   String name;
   int age;
   String designation;
   double salary;

   // This is the constructor of the class Employee
   public Employee(String name) {
      this.name = name;
   }

   // Assign the age of the Employee  to the variable age.
   public void empAge(int empAge) {
      age = empAge;
   }

   /* Assign the designation to the variable designation.*/
   public void empDesignation(String empDesig) {
      designation = empDesig;
   }

   /* Assign the salary to the variable salary.*/
   public void empSalary(double empSalary) {
      salary = empSalary;
   }

   /* Print the Employee details */
   public void printEmployee() {
      System.out.println("Name:"+ name );
      System.out.println("Age:" + age );
      System.out.println("Designation:" + designation );
      System.out.println("Salary:" + salary);
   }
}
जैसा कि पहले इस ट्यूटोरियल में बताया गया है, प्रोसेसिंग मुख्य विधि से शुरू होती है। इसलिए, इस कर्मचारी वर्ग को चलाने के लिए हमारे पास एक मुख्य तरीका होना चाहिए और वस्तुओं का निर्माण होना चाहिए। हम इन कार्यों के लिए एक अलग वर्ग तैयार करेंगे।
निम्नलिखित कर्मचारी वर्ग है, जो वर्ग कर्मचारी के दो उदाहरण बनाता है और प्रत्येक चर के लिए मान नियत करने के लिए प्रत्येक वस्तु के तरीकों का आह्वान करता है।
निम्न कोड को EmployeeTest.java फ़ाइल में सहेजें।
import java.io.*;
public class EmployeeTest {

   public static void main(String args[]) {
      /* Create two objects using constructor */
      Employee empOne = new Employee("James Smith");
      Employee empTwo = new Employee("Mary Anne");

      // Invoking methods for each object created
      empOne.empAge(26);
      empOne.empDesignation("Senior Software Engineer");
      empOne.empSalary(1000);
      empOne.printEmployee();

      empTwo.empAge(21);
      empTwo.empDesignation("Software Engineer");
      empTwo.empSalary(500);
      empTwo.printEmployee();
   }
}
Output
C:\> javac Employee.java
C:\> javac EmployeeTest.java
C:\> java EmployeeTest
Name:James Smith
Age:26
Designation:Senior Software Engineer
Salary:1000.0
Name:Mary Anne
Age:21
Designation:Software Engineer
Salary:500.0
एक निर्माणकर्ता एक ऑब्जेक्ट को तब बनाता है जब इसे बनाया जाता है। इसका वर्ग के समान नाम है और यह एक विधि के समान ही है। हालांकि, बिल्डरों के पास कोई स्पष्ट रिटर्न प्रकार नहीं है।
आमतौर पर, आप क्लास द्वारा परिभाषित उदाहरण चर के लिए प्रारंभिक मान देने के लिए या पूरी तरह से बनाई गई ऑब्जेक्ट बनाने के लिए आवश्यक किसी भी अन्य स्टार्ट-अप प्रक्रियाओं को करने के लिए एक कंस्ट्रक्टर का उपयोग करेंगे।
सभी वर्गों में कंस्ट्रक्टर होते हैं, चाहे आप एक को परिभाषित करें या न करें, क्योंकि जावा स्वचालित रूप से एक डिफ़ॉल्ट कंस्ट्रक्टर प्रदान करता है जो सभी सदस्य चर को शून्य पर आरंभीकृत करता है। हालांकि, एक बार जब आप अपने स्वयं के कंस्ट्रक्टर को परिभाषित करते हैं, तो डिफ़ॉल्ट कंस्ट्रक्टर का उपयोग नहीं किया जाता है।
Syntax
निर्माणकर्ता का वाक्य विन्यास निम्नलिखित है -
class ClassName {
   ClassName() {
   }
}
जावा दो प्रकार के निर्माणकर्ताओं को अनुमति देता है -
कोई तर्क नहीं
पैरामीटर संचित
No argument Constructors
जैसा कि नाम निर्दिष्ट करता है कि जावा का कोई तर्क निर्माणकर्ता इसके बजाय किसी भी पैरामीटर को स्वीकार नहीं करता है, इन कंस्ट्रक्टरों का उपयोग करते हुए एक विधि के उदाहरण चर को सभी वस्तुओं के लिए निश्चित मानों के साथ आरंभ किया जाएगा।
Example
Public class MyClass {
   Int num;
   MyClass() {
      num = 100;
   }
}
आप कंस्ट्रक्टर को ऑब्जेक्ट्स को इनिशियलाइज़ करने के लिए निम्नानुसार कहेंगे
public class ConsDemo {
   public static void main(String args[]) {
      MyClass t1 = new MyClass();
      MyClass t2 = new MyClass();
      System.out.println(t1.num + " " + t2.num);
   }
}
यह निम्नलिखित परिणाम का उत्पादन करेगा
100 100
Parameterized Constructors
सबसे अधिक बार, आपको एक निर्माता की आवश्यकता होगी जो एक या अधिक मापदंडों को स्वीकार करता है। पैरामीटर को एक कंस्ट्रक्टर में उसी तरह से जोड़ा जाता है जिस तरह से उन्हें एक विधि में जोड़ा जाता है, बस कंस्ट्रक्टर के नाम के बाद उन्हें कोष्ठक के अंदर घोषित करें।
Example
// A simple constructor.
class MyClass {
   int x;

   // Following is the constructor
   MyClass(int i ) {
      x = i;
   }
}
आप कंस्ट्रक्टर को ऑब्जेक्ट को इनिशियलाइज़ करने के लिए इस प्रकार कहेंगे -
public class ConsDemo {
   public static void main(String args[]) {
      MyClass t1 = new MyClass( 10 );
      MyClass t2 = new MyClass( 20 );
      System.out.println(t1.x + " " + t2.x);
   }
}
यह निम्नलिखित परिणाम का उत्पादन करेगा -
10 20
Variables are nothing but reserved memory locations to store values. This means that when you create a variable you reserve some space in the memory.
Based on the data type of a variable, the operating system allocates memory and decides what can be stored in the reserved memory. Therefore, by assigning different data types to variables, you can store integers, decimals, or characters in these variables.
There are two data types available in Java −
- Primitive Data Types
- Reference/Object Data Types
Primitive Data Types
There are eight primitive datatypes supported by Java. Primitive datatypes are predefined by the language and named by a keyword. Let us now look into the eight primitive data types in detail.
byte
- Byte data type is an 8-bit signed two's complement integer
- Minimum value is -128 (-2^7)
- Maximum value is 127 (inclusive)(2^7 -1)
- Default value is 0
- Byte data type is used to save space in large arrays, mainly in place of integers, since a byte is four times smaller than an integer.
- Example: byte a = 100, byte b = -50
short
- Short data type is a 16-bit signed two's complement integer
- Minimum value is -32,768 (-2^15)
- Maximum value is 32,767 (inclusive) (2^15 -1)
- Short data type can also be used to save memory as byte data type. A short is 2 times smaller than an integer
- Default value is 0.
- Example: short s = 10000, short r = -20000
int
- Int data type is a 32-bit signed two's complement integer.
- Minimum value is - 2,147,483,648 (-2^31)
- Maximum value is 2,147,483,647(inclusive) (2^31 -1)
- Integer is generally used as the default data type for integral values unless there is a concern about memory.
- The default value is 0
- Example: int a = 100000, int b = -200000
long
- Long data type is a 64-bit signed two's complement integer
- Minimum value is -9,223,372,036,854,775,808(-2^63)
- Maximum value is 9,223,372,036,854,775,807 (inclusive)(2^63 -1)
- This type is used when a wider range than int is needed
- Default value is 0L
- Example: long a = 100000L, long b = -200000L
float
- Float data type is a single-precision 32-bit IEEE 754 floating point
- Float is mainly used to save memory in large arrays of floating point numbers
- Default value is 0.0f
- Float data type is never used for precise values such as currency
- Example: float f1 = 234.5f
double
- double data type is a double-precision 64-bit IEEE 754 floating point
- This data type is generally used as the default data type for decimal values, generally the default choice
- Double data type should never be used for precise values such as currency
- Default value is 0.0d
- Example: double d1 = 123.4
boolean
- boolean data type represents one bit of information
- There are only two possible values: true and false
- This data type is used for simple flags that track true/false conditions
- Default value is false
- Example: boolean one = true
char
- char data type is a single 16-bit Unicode character
- Minimum value is '\u0000' (or 0)
- Maximum value is '\uffff' (or 65,535 inclusive)
- Char data type is used to store any character
- Example: char letterA = 'A'
Reference Datatypes
- Reference variables are created using defined constructors of the classes. They are used to access objects. These variables are declared to be of a specific type that cannot be changed. For example, Employee, Puppy, etc.
- Class objects and various type of array variables come under reference datatype.
- Default value of any reference variable is null.
- A reference variable can be used to refer any object of the declared type or any compatible type.
- Example: Animal animal = new Animal("giraffe");
Java Literals
A literal is a source code representation of a fixed value. They are represented directly in the code without any computation.
Literals can be assigned to any primitive type variable. For example −
byte a = 68;
char a = 'A';
byte, int, long, and short can be expressed in decimal(base 10), hexadecimal(base 16) or octal(base 8) number systems as well.
Prefix 0 is used to indicate octal, and prefix 0x indicates hexadecimal when using these number systems for literals. For example −
int decimal = 100;
int octal = 0144;
int hexa =  0x64;
String literals in Java are specified like they are in most other languages by enclosing a sequence of characters between a pair of double quotes. Examples of string literals are −
Example
"Hello World"
"two\nlines"
"\"This is in quotes\""
String and char types of literals can contain any Unicode characters. For example −
char a = '\u0001';
String a = "\u0001";
Java language supports few special escape sequences for String and char literals as well. They are −
| Notation | Character represented |
|---|---|
| \n | Newline (0x0a) |
| \r | Carriage return (0x0d) |
| \f | Formfeed (0x0c) |
| \b | Backspace (0x08) |
| \s | Space (0x20) |
| \t | tab |
| \" | Double quote |
| \' | Single quote |
| \\ | backslash |
| \ddd | Octal character (ddd) |
| \uxxxx | Hexadecimal UNICODE character (xxxx) |
एक चर हमें नामित भंडारण प्रदान करता है जिसे हमारे कार्यक्रम हेरफेर कर सकते हैं। जावा में प्रत्येक चर का एक विशिष्ट प्रकार है, जो चर की स्मृति के आकार और लेआउट को निर्धारित करता है; मूल्यों की सीमा जो उस मेमोरी में संग्रहीत की जा सकती है; और संचालन का सेट जो चर पर लागू किया जा सकता है।
उपयोग किए जाने से पहले आपको सभी चर घोषित करने होंगे। निम्नलिखित एक चर घोषणा का मूल रूप है -
डेटा प्रकार चर [= value] [, चर [= value] ...];
यहां डेटा प्रकार जावा के डेटाटिप्स में से एक है और चर का नाम चर है। निर्दिष्ट प्रकार के एक से अधिक चर घोषित करने के लिए, आप अल्पविराम से अलग की गई सूची का उपयोग कर सकते हैं।
जावा में चर घोषणा और आरंभीकरण के मान्य उदाहरण निम्नलिखित हैं -
उदाहरण
int a, b, c; // तीन ints, a, b और c की घोषणा करता है।
int a = 10, b = 10; // इनिशियलाइजेशन का उदाहरण
बाइट बी = 22; // बाइट प्रकार वैरिएबल बी को इनिशियलाइज़ करता है।
डबल पाई = 3.14159; // PI का मान बताता है और असाइन करता है।
char a = 'a'; // वैरिएबल चर आईआईएस इनिशियलाइज़्ड विथ वैल्यू 'ए'
यह अध्याय जावा भाषा में उपलब्ध विभिन्न चर प्रकारों की व्याख्या करेगा। जावा में तीन प्रकार के चर हैं -
स्थानीय चर
आवृत्ति के चर
कक्षा / स्थैतिक चर
स्थानीय चर
स्थानीय चर तरीकों, कंस्ट्रक्टरों या ब्लॉकों में घोषित किए जाते हैं।
स्थानीय चर तब बनाए जाते हैं जब विधि, कंस्ट्रक्टर या ब्लॉक में प्रवेश किया जाता है और विधि, कंस्ट्रक्टर या ब्लॉक को बाहर करने के बाद चर को नष्ट कर दिया जाएगा।
एक्सेस चर का उपयोग स्थानीय चर के लिए नहीं किया जा सकता है।
स्थानीय चर केवल घोषित विधि, कंस्ट्रक्टर या ब्लॉक के भीतर दिखाई देते हैं।
स्थानीय चर को आंतरिक रूप से स्टैक स्तर पर लागू किया जाता है।
स्थानीय चर के लिए कोई डिफ़ॉल्ट मान नहीं है, इसलिए स्थानीय चर घोषित किए जाने चाहिए और पहले उपयोग से पहले एक प्रारंभिक मूल्य सौंपा जाना चाहिए।
उदाहरण
यहां, उम्र एक स्थानीय चर है। इसे pupAge () विधि के अंदर परिभाषित किया गया है और इसका दायरा केवल इस विधि तक सीमित है।
लाइव डेमो
पब्लिक क्लास टेस्ट {
सार्वजनिक शून्य प्यूपा () {
int age = 0;
उम्र = आयु + 7;
System.out.println ("पिल्ला की आयु है:" + आयु);
}
सार्वजनिक स्थैतिक शून्य main (String [] args[]) {
परीक्षण परीक्षण = नया परीक्षण ();
test.pupAge ();
}
}
यह निम्नलिखित परिणाम का उत्पादन करेगा -
उत्पादन
पिल्ला की उम्र है: 7
उदाहरण
उदाहरण के बाद इसका उपयोग किए बिना उम्र का उपयोग किया जाता है, इसलिए यह संकलन के समय एक त्रुटि देगा।
लाइव डेमो
पब्लिक क्लास टेस्ट {
सार्वजनिक शून्य प्यूपा () {
int उम्र;
उम्र = आयु + 7;
System.out.println ("पिल्ला की आयु है:" + आयु);
}
सार्वजनिक स्थैतिक शून्य main (String [] args[]) {
परीक्षण परीक्षण = नया परीक्षण ();
test.pupAge ();
}
}
इसे संकलित करते समय निम्नलिखित त्रुटि उत्पन्न होगी -
उत्पादन
Test.java:4:variable संख्या आरंभीकृत नहीं किया गया हो सकता है
उम्र = आयु + 7;
^
1 त्रुटि
आवृत्ति के चर
इंस्टेंस चर को एक वर्ग में घोषित किया जाता है, लेकिन एक विधि, कंस्ट्रक्टर या किसी ब्लॉक के बाहर।
जब ढेर में किसी ऑब्जेक्ट के लिए एक स्थान आवंटित किया जाता है, तो प्रत्येक आवृत्ति चर मान के लिए एक स्लॉट बनाया जाता है।
इंस्टेंस चर तब बनाए जाते हैं जब किसी ऑब्जेक्ट को 'नए' के उपयोग के साथ बनाया जाता है और ऑब्जेक्ट के नष्ट होने पर नष्ट हो जाता है।
इंस्टेंस चर उन मानों को रखते हैं जिन्हें एक से अधिक विधि, कंस्ट्रक्टर या ब्लॉक या किसी ऑब्जेक्ट के राज्य के आवश्यक भागों द्वारा संदर्भित किया जाना चाहिए जो पूरे कक्षा में मौजूद होना चाहिए।
उपयोग से पहले या बाद में कक्षा स्तर में इंस्टेंस चर घोषित किए जा सकते हैं।
उदाहरण के चर के लिए एक्सेस संशोधक दिए जा सकते हैं।
उदाहरण चर वर्ग में सभी तरीकों, निर्माणकर्ताओं और ब्लॉक के लिए दिखाई देते हैं। आम तौर पर, इन चर को निजी (एक्सेस स्तर) बनाने की सिफारिश की जाती है। हालाँकि, उपवर्गों के लिए दृश्यता पहुँच संशोधक के उपयोग के साथ इन चरों के लिए दी जा सकती है।
इंस्टेंस चर में डिफ़ॉल्ट मान होते हैं। संख्याओं के लिए, डिफ़ॉल्ट मान 0 है, बूलियंस के लिए यह गलत है, और ऑब्जेक्ट संदर्भों के लिए यह शून्य है। मूल्यों को घोषणा के दौरान या निर्माणकर्ता के भीतर सौंपा जा सकता है।
इंस्टेंस वेरिएबल को सीधे क्लास के अंदर वेरिएबल नाम से कॉल करके एक्सेस किया जा सकता है। हालांकि, स्थैतिक तरीकों के भीतर (जब उदाहरण चर को पहुंच प्रदान की जाती है), उन्हें पूरी तरह से योग्य नाम का उपयोग करके बुलाया जाना चाहिए। ObjectReference.VariableName।
उदाहरण
लाइव डेमो
आयात java.io. *;
सार्वजनिक वर्ग के कर्मचारी {
// यह उदाहरण चर किसी भी बाल वर्ग के लिए दिखाई देता है।
सार्वजनिक स्ट्रिंग नाम;
// वेतन चर केवल कर्मचारी वर्ग में दिखाई देता है।
निजी डबल वेतन;
// नाम चर में असाइन किया गया है।
सार्वजनिक कर्मचारी (स्ट्रिंग नाम) {
name = empName;
}
// वेतन चर को एक मान दिया जाता है।
सार्वजनिक शून्य सेट सैलेरी (डबल एम्सल) {
वेतन = एम्पासल;
}
// यह विधि कर्मचारी के विवरण को प्रिंट करती है।
सार्वजनिक शून्य प्रिंटइम्प () {
System.out.println ("नाम:" + नाम);
System.out.println ("वेतन:" + वेतन);
}
सार्वजनिक स्थैतिक शून्य main (String [] args[]) {
कर्मचारी एम्पोइन = नया कर्मचारी ("रनसिका");
empOne.setSalary (1000);
empOne.printEmp ();
}
Modifiers are keywords that you add to those definitions to change their meanings. Java language has a wide variety of modifiers, including the following −
To use a modifier, you include its keyword in the definition of a class, method, or variable. The modifier precedes the rest of the statement, as in the following example.
Example
public class className {
   // ...
}

private boolean myFlag;
static final double weeks = 9.5;
protected static final int BOXWIDTH = 42;

public static void main(String[] arguments) {
   // body of method
}
Access Control Modifiers
Java provides a number of access modifiers to set access levels for classes, variables, methods and constructors. The four access levels are −
- Visible to the package, the default. No modifiers are needed.
- Visible to the class only (private).
- Visible to the world (public).
- Visible to the package and all subclasses (protected).
Non-Access Modifiers
Java provides a number of non-access modifiers to achieve many other functionality.
- The static modifier for creating class methods and variables.
- The final modifier for finalizing the implementations of classes, methods, and variables.
- The abstract modifier for creating abstract classes and methods.
- The synchronized and volatile modifiers, which are used for threads
Java provides a rich set of operators to manipulate variables. We can divide all the Java operators into the following groups −
- Arithmetic Operators
- Relational Operators
- Bitwise Operators
- Logical Operators
- Assignment Operators
- Misc Operators
The Arithmetic Operators
Arithmetic operators are used in mathematical expressions in the same way that they are used in algebra. The following table lists the arithmetic operators −
Assume integer variable A holds 10 and variable B holds 20, then −
| Operator | Description | Example |
|---|---|---|
| + (Addition) | Adds values on either side of the operator. | A + B will give 30 |
| - (Subtraction) | Subtracts right-hand operand from left-hand operand. | A - B will give -10 |
| * (Multiplication) | Multiplies values on either side of the operator. | A * B will give 200 |
| / (Division) | Divides left-hand operand by right-hand operand. | B / A will give 2 |
| % (Modulus) | Divides left-hand operand by right-hand operand and returns remainder. | B % A will give 0 |
| ++ (Increment) | Increases the value of operand by 1. | B++ gives 21 |
| -- (Decrement) | Decreases the value of operand by 1. | B-- gives 19 |
The Relational Operators
There are following relational operators supported by Java language.
Assume variable A holds 10 and variable B holds 20, then −
| Operator | Description | Example |
|---|---|---|
| == (equal to) | Checks if the values of two operands are equal or not, if yes then condition becomes true. | (A == B) is not true. |
| != (not equal to) | Checks if the values of two operands are equal or not, if values are not equal then condition becomes true. | (A != B) is true. |
| > (greater than) | Checks if the value of left operand is greater than the value of right operand, if yes then condition becomes true. | (A > B) is not true. |
| < (less than) | Checks if the value of left operand is less than the value of right operand, if yes then condition becomes true. | (A < B) is true. |
| >= (greater than or equal to) | Checks if the value of left operand is greater than or equal to the value of right operand, if yes then condition becomes true. | (A >= B) is not true. |
| <= (less than or equal to) | Checks if the value of left operand is less than or equal to the value of right operand, if yes then condition becomes true. | (A <= B) is true. |
The Bitwise Operators
Java defines several bitwise operators, which can be applied to the integer types, long, int, short, char, and byte.
Bitwise operator works on bits and performs bit-by-bit operation. Assume if a = 60 and b = 13; now in binary format they will be as follows −
a = 0011 1100
b = 0000 1101
-----------------
a&b = 0000 1100
a|b = 0011 1101
a^b = 0011 0001
~a = 1100 0011
The following table lists the bitwise operators −
Assume integer variable A holds 60 and variable B holds 13 then −
| Operator | Description | Example |
|---|---|---|
| & (bitwise and) | Binary AND Operator copies a bit to the result if it exists in both operands. | (A & B) will give 12 which is 0000 1100 |
| | (bitwise or) | Binary OR Operator copies a bit if it exists in either operand. | (A | B) will give 61 which is 0011 1101 |
| ^ (bitwise XOR) | Binary XOR Operator copies the bit if it is set in one operand but not both. | (A ^ B) will give 49 which is 0011 0001 |
| ~ (bitwise compliment) | Binary Ones Complement Operator is unary and has the effect of 'flipping' bits. | (~A ) will give -61 which is 1100 0011 in 2's complement form due to a signed binary number. |
| << (left shift) | Binary Left Shift Operator. The left operands value is moved left by the number of bits specified by the right operand. | A << 2 will give 240 which is 1111 0000 |
| >> (right shift) | Binary Right Shift Operator. The left operands value is moved right by the number of bits specified by the right operand. | A >> 2 will give 15 which is 1111 |
| >>> (zero fill right shift) | Shift right zero fill operator. The left operands value is moved right by the number of bits specified by the right operand and shifted values are filled up with zeros. | A >>>2 will give 15 which is 0000 1111 |
The Logical Operators
The following table lists the logical operators −
Assume Boolean variables A holds true and variable B holds false, then −
| Operator | Description | Example |
|---|---|---|
| && (logical and) | Called Logical AND operator. If both the operands are non-zero, then the condition becomes true. | (A && B) is false |
| || (logical or) | Called Logical OR Operator. If any of the two operands are non-zero, then the condition becomes true. | (A || B) is true |
| ! (logical not) | Called Logical NOT Operator. Use to reverses the logical state of its operand. If a condition is true then Logical NOT operator will make false. | !(A && B) is true |
The Assignment Operators
Following are the assignment operators supported by Java language −
| Operator | Description | Example |
|---|---|---|
| = | Simple assignment operator. Assigns values from right side operands to left side operand. | C = A + B will assign value of A + B into C |
| += | Add AND assignment operator. It adds right operand to the left operand and assign the result to left operand. | C += A is equivalent to C = C + A |
| -= | Subtract AND assignment operator. It subtracts right operand from the left operand and assign the result to left operand. | C -= A is equivalent to C = C – A |
| *= | Multiply AND assignment operator. It multiplies right operand with the left operand and assign the result to left operand. | C *= A is equivalent to C = C * A |
| /= | Divide AND assignment operator. It divides left operand with the right operand and assign the result to left operand. | C /= A is equivalent to C = C / A |
| %= | Modulus AND assignment operator. It takes modulus using two operands and assign the result to left operand. | C %= A is equivalent to C = C % A |
| <<= | Left shift AND assignment operator. | C <<= 2 is same as C = C << 2 |
| >>= | Right shift AND assignment operator. | C >>= 2 is same as C = C >> 2 |
| &= | Bitwise AND assignment operator. | C &= 2 is same as C = C & 2 |
| ^= | bitwise exclusive OR and assignment operator. | C ^= 2 is same as C = C ^ 2 |
| |= | bitwise inclusive OR and assignment operator. | C |= 2 is same as C = C | 2 |
Miscellaneous Operators
There are few other operators supported by Java Language.
Conditional Operator ( ? : )
Conditional operator is also known as the ternary operator. This operator consists of three operands and is used to evaluate Boolean expressions. The goal of the operator is to decide, which value should be assigned to the variable. The operator is written as −
variable x = (expression) ? value if true : value if false
Following is an example −
Example
public class Test {

   public static void main(String args[]) {
      int a, b;
      a = 10;
      b = (a == 1) ? 20: 30;
      System.out.println( "Value of b is : " +  b );

      b = (a == 10) ? 20: 30;
      System.out.println( "Value of b is : " + b );
   }
}
This will produce the following result −
Output
Value of b is : 30
Value of b is : 20
instanceof Operator
This operator is used only for object reference variables. The operator checks whether the object is of a particular type (class type or interface type). instanceof operator is written as −
( Object reference variable ) instanceof (class/interface type)
If the object referred by the variable on the left side of the operator passes the IS-A check for the class/interface type on the right side, then the result will be true. Following is an example −
Example
public class Test {

   public static void main(String args[]) {

      String name = "James";

      // following will return true since name is type of String
      boolean result = name instanceof String;
      System.out.println( result );
   }
}
This will produce the following result −
Output
true
This operator will still return true, if the object being compared is the assignment compatible with the type on the right. Following is one more example −
Example
class Vehicle {}

public class Car extends Vehicle {

   public static void main(String args[]) {

      Vehicle a = new Car();
      boolean result =  a instanceof Car;
      System.out.println( result );
   }
}
This will produce the following result −
Output
true
Precedence of Java Operators
Operator precedence determines the grouping of terms in an expression. This affects how an expression is evaluated. Certain operators have higher precedence than others; for example, the multiplication operator has higher precedence than the addition operator −
For example, x = 7 + 3 * 2; here x is assigned 13, not 20 because operator * has higher precedence than +, so it first gets multiplied with 3 * 2 and then adds into 7.
Here, operators with the highest precedence appear at the top of the table, those with the lowest appear at the bottom. Within an expression, higher precedence operators will be evaluated first.
| Category | Operator | Associativity |
|---|---|---|
| Postfix | expression++ expression-- | Left to right |
| Unary | ++expression –-expression +expression –expression ~ ! | Right to left |
| Multiplicative | * / % | Left to right |
| Additive | + - | Left to right |
| Shift | << >> >>> | Left to right |
| Relational | < > <= >= instanceof | Left to right |
| Equality | == != | Left to right |
| Bitwise AND | & | Left to right |
| Bitwise XOR | ^ | Left to right |
| Bitwise OR | | | Left to right |
| Logical AND | && | Left to right |
| Logical OR | || | Left to right |
| Conditional | ?: | Right to left |
| Assignment | = += -= *= /= %= ^= |= <<= >>= >>>= | Right to left |
Java - Loop Control
There may be a situation when you need to execute a block of code several number of times. In general, statements are executed sequentially: The first statement in a function is executed first, followed by the second, and so on.
Programming languages provide various control structures that allow for more complicated execution paths.
A loop statement allows us to execute a statement or group of statements multiple times and following is the general form of a loop statement in most of the programming languages −
Java programming language provides the following types of loop to handle looping requirements. Click the following links to check their detail.
| Sr.No. | Loop & Description |
|---|---|
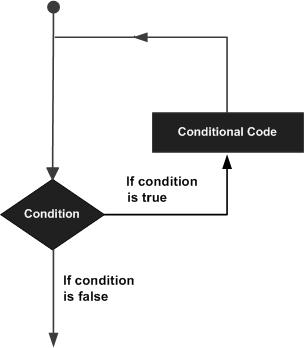
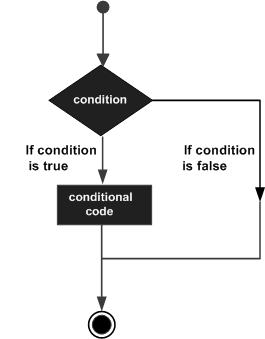
| 1 | while loop
Repeats a statement or group of statements while a given condition is true. It tests the condition before executing the loop body.
|
| 2 | for loop
Execute a sequence of statements multiple times and abbreviates the code that manages the loop variable.
|
| 3 | do...while loop
Like a while statement, except that it tests the condition at the end of the loop body.
|
Loop Control Statements
Loop control statements change execution from its normal sequence. When execution leaves a scope, all automatic objects that were created in that scope are destroyed.
Java supports the following control statements. Click the following links to check their detail.
| Sr.No. | Control Statement & Description |
|---|---|
| 1 | break statement
Terminates the loop or switch statement and transfers execution to the statement immediately following the loop or switch.
|
| 2 | continue statement
Causes the loop to skip the remainder of its body and immediately retest its condition prior to reiterating.
|
Enhanced for loop in Java
As of Java 5, the enhanced for loop was introduced. This is mainly used to traverse collection of elements including arrays.
Syntax
Following is the syntax of enhanced for loop −
for(declaration : expression) {
   // Statements
}
- Declaration − The newly declared block variable, is of a type compatible with the elements of the array you are accessing. The variable will be available within the for block and its value would be the same as the current array element.
- Expression − This evaluates to the array you need to loop through. The expression can be an array variable or method call that returns an array.
Example
public class Test {

   public static void main(String args[]) {
      int [] numbers = {10, 20, 30, 40, 50};

      for(int x : numbers ) {
         System.out.print( x );
         System.out.print(",");
      }
      System.out.print("\n");
      String [] names = {"James", "Larry", "Tom", "Lacy"};

      for( String name : names ) {
         System.out.print( name );
         System.out.print(",");
      }
   }
}
This will produce the following result −
Output
10, 20, 30, 40, 50,
James, Larry, Tom, Lacy,
Java - Decision Making
Decision making structures have one or more conditions to be evaluated or tested by the program, along with a statement or statements that are to be executed if the condition is determined to be true, and optionally, other statements to be executed if the condition is determined to be false.
Following is the general form of a typical decision making structure found in most of the programming languages −
Java programming language provides following types of decision making statements. Click the following links to check their detail.
| Sr.No. | Statement & Description |
|---|---|
| 1 | if statement
An if statement consists of a boolean expression followed by one or more statements.
|
| 2 | if...else statement
An if statement can be followed by an optional else statement, which executes when the boolean expression is false.
|
| 3 | nested if statement
You can use one if or else if statement inside another if or else if statement(s).
|
| 4 | switch statement
A switch statement allows a variable to be tested for equality against a list of values.
|
The ? : Operator
We have covered conditional operator ? : in the previous chapter which can be used to replace if...else statements. It has the following general form −
Exp1 ? Exp2 : Exp3;
Where Exp1, Exp2, and Exp3 are expressions. Notice the use and placement of the colon.
To determine the value of the whole expression, initially exp1 is evaluated.
- If the value of exp1 is true, then the value of Exp2 will be the value of the whole expression.
- If the value of exp1 is false, then Exp3 is evaluated and its value becomes the value of the entire expression.
Java - Numbers Class
Normally, when we work with Numbers, we use primitive data types such as byte, int, long, double, etc.
Example
int i = 5000;
float gpa = 13.65;
double mask = 0xaf;
However, in development, we come across situations where we need to use objects instead of primitive data types. In order to achieve this, Java provides wrapper classes.
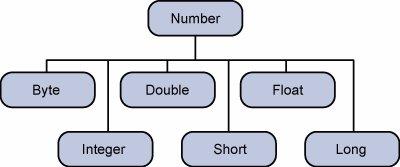
All the wrapper classes (Integer, Long, Byte, Double, Float, Short) are subclasses of the abstract class Number.
The object of the wrapper class contains or wraps its respective primitive data type. Converting primitive data types into object is called boxing, and this is taken care by the compiler. Therefore, while using a wrapper class you just need to pass the value of the primitive data type to the constructor of the Wrapper class.
And the Wrapper object will be converted back to a primitive data type, and this process is called unboxing. The Number class is part of the java.lang package.
Following is an example of boxing and unboxing −
Example
public class Test {

   public static void main(String args[]) {
      Integer x = 5; // boxes int to an Integer object
      x =  x + 10;   // unboxes the Integer to a int
      System.out.println(x);
   }
}
This will produce the following result −
Output
15
When x is assigned an integer value, the compiler boxes the integer because x is integer object. Later, x is unboxed so that they can be added as an integer.
Number Methods
Following is the list of the instance methods that all the subclasses of the Number class implements −
| Sr.No. | Method & Description |
|---|---|
| 1 | xxxValue()
Converts the value of this Number object to the xxx data type and returns it.
|
| 2 | compareTo()
Compares this Number object to the argument.
|
| 3 | equals()
Determines whether this number object is equal to the argument.
|
| 4 | valueOf()
Returns an Integer object holding the value of the specified primitive.
|
| 5 | toString()
Returns a String object representing the value of a specified int or Integer.
|
| 6 | parseInt()
This method is used to get the primitive data type of a certain String.
|
| 7 | abs()
Returns the absolute value of the argument.
|
| 8 | ceil()
Returns the smallest integer that is greater than or equal to the argument. Returned as a double.
|
| 9 | floor()
Returns the largest integer that is less than or equal to the argument. Returned as a double.
|
| 10 | rint()
Returns the integer that is closest in value to the argument. Returned as a double.
|
| 11 | round()
Returns the closest long or int, as indicated by the method's return type to the argument.
|
| 12 | min()
Returns the smaller of the two arguments.
|
| 13 | max()
Returns the larger of the two arguments.
|
| 14 | exp()
Returns the base of the natural logarithms, e, to the power of the argument.
|
| 15 | log()
Returns the natural logarithm of the argument.
|
| 16 | pow()
Returns the value of the first argument raised to the power of the second argument.
|
| 17 | sqrt()
Returns the square root of the argument.
|
| 18 | sin()
Returns the sine of the specified double value.
|
| 19 | cos()
Returns the cosine of the specified double value.
|
| 20 | tan()
Returns the tangent of the specified double value.
|
| 21 | asin()
Returns the arcsine of the specified double value.
|
| 22 | acos()
Returns the arccosine of the specified double value.
|
| 23 | atan()
Returns the arctangent of the specified double value.
|
| 24 | atan2()
Converts rectangular coordinates (x, y) to polar coordinate (r, theta) and returns theta.
|
| 25 | toDegrees()
Converts the argument to degrees.
|
| 26 | toRadians()
Converts the argument to radians.
|
| 27 | random()
Returns a random number.
|
Java - Character Class
Normally, when we work with characters, we use primitive data types char.
Example
char ch = 'a';

// Unicode for uppercase Greek omega character
char uniChar = '\u039A';

// an array of chars
char[] charArray ={ 'a', 'b', 'c', 'd', 'e' };
However in development, we come across situations where we need to use objects instead of primitive data types. In order to achieve this, Java provides wrapper class Character for primitive data type char.
The Character class offers a number of useful class (i.e., static) methods for manipulating characters. You can create a Character object with the Character constructor −
Character ch = new Character('a');
The Java compiler will also create a Character object for you under some circumstances. For example, if you pass a primitive char into a method that expects an object, the compiler automatically converts the char to a Character for you. This feature is called autoboxing or unboxing, if the conversion goes the other way.
Example
// Here following primitive char 'a'
// is boxed into the Character object ch
Character ch = 'a';

// Here primitive 'x' is boxed for method test,
// return is unboxed to char 'c'
char c = test('x');
Escape Sequences
A character preceded by a backslash (\) is an escape sequence and has a special meaning to the compiler.
The newline character (\n) has been used frequently in this tutorial in System.out.println() statements to advance to the next line after the string is printed.
Following table shows the Java escape sequences −
| Escape Sequence | Description |
|---|---|
| \t | Inserts a tab in the text at this point. |
| \b | Inserts a backspace in the text at this point. |
| \n | Inserts a newline in the text at this point. |
| \r | Inserts a carriage return in the text at this point. |
| \f | Inserts a form feed in the text at this point. |
| \' | Inserts a single quote character in the text at this point. |
| \" | Inserts a double quote character in the text at this point. |
| \\ | Inserts a backslash character in the text at this point. |
When an escape sequence is encountered in a print statement, the compiler interprets it accordingly.
Example
If you want to put quotes within quotes, you must use the escape sequence, \", on the interior quotes −
public class Test {

   public static void main(String args[]) {
      System.out.println("She said \"Hello!\" to me.");
   }
}
This will produce the following result −
Output
She said "Hello!" to me.
Character Methods
Following is the list of the important instance methods that all the subclasses of the Character class implement −
| Sr.No. | Method & Description |
|---|---|
| 1 | isLetter()
Determines whether the specified char value is a letter.
|
| 2 | isDigit()
Determines whether the specified char value is a digit.
|
| 3 | isWhitespace()
Determines whether the specified char value is white space.
|
| 4 | isUpperCase()
Determines whether the specified char value is uppercase.
|
| 5 | isLowerCase()
Determines whether the specified char value is lowercase.
|
| 6 | toUpperCase()
Returns the uppercase form of the specified char value.
|
| 7 | toLowerCase()
Returns the lowercase form of the specified char value.
|
| 8 | toString()
Returns a String object representing the specified character value that is, a one-character string.
|
For a complete list of methods, please refer to the java.lang.Character API specification.
Java - Strings Class
Strings, which are widely used in Java programming, are a sequence of characters. In Java programming language, strings are treated as objects.
The Java platform provides the String class to create and manipulate strings.
Creating Strings
The most direct way to create a string is to write −
String greeting = "Hello world!";
Whenever it encounters a string literal in your code, the compiler creates a String object with its value in this case, "Hello world!'.
As with any other object, you can create String objects by using the new keyword and a constructor. The String class has 11 constructors that allow you to provide the initial value of the string using different sources, such as an array of characters.
Example
public class StringDemo {

   public static void main(String args[]) {
      char[] helloArray = { 'h', 'e', 'l', 'l', 'o', '.' };
      String helloString = new String(helloArray);
      System.out.println( helloString );
   }
}
This will produce the following result −
Output
hello.
Note − The String class is immutable, so that once it is created a String object cannot be changed. If there is a necessity to make a lot of modifications to Strings of characters, then you should use String Buffer & String Builder Classes.
String Length
Methods used to obtain information about an object are known as accessor methods. One accessor method that you can use with strings is the length() method, which returns the number of characters contained in the string object.
The following program is an example of length(), method String class.
Example
public class StringDemo {

   public static void main(String args[]) {
      String palindrome = "Dot saw I was Tod";
      int len = palindrome.length();
      System.out.println( "String Length is : " + len );
   }
}
This will produce the following result −
Output
String Length is : 17
Concatenating Strings
The String class includes a method for concatenating two strings −
string1.concat(string2);
This returns a new string that is string1 with string2 added to it at the end. You can also use the concat() method with string literals, as in −
"My name is ".concat("Zara");
Strings are more commonly concatenated with the + operator, as in −
"Hello," + " world" + "!"
which results in −
"Hello, world!"
Let us look at the following example −
Example
public class StringDemo {

   public static void main(String args[]) {
      String string1 = "saw I was ";
      System.out.println("Dot " + string1 + "Tod");
   }
}
This will produce the following result −
Output
Dot saw I was Tod
Creating Format Strings
You have printf() and format() methods to print output with formatted numbers. The String class has an equivalent class method, format(), that returns a String object rather than a PrintStream object.
Using String's static format() method allows you to create a formatted string that you can reuse, as opposed to a one-time print statement. For example, instead of −
Example
System.out.printf("The value of the float variable is " +
                  "%f, while the value of the integer " +
                  "variable is %d, and the string " +
                  "is %s", floatVar, intVar, stringVar);
You can write −
String fs;
fs = String.format("The value of the float variable is " +
                   "%f, while the value of the integer " +
                   "variable is %d, and the string " +
                   "is %s", floatVar, intVar, stringVar);
System.out.println(fs);
String Methods
Here is the list of methods supported by String class −
| Sr.No. | Method & Description |
|---|---|
| 1 | char charAt(int index)
Returns the character at the specified index.
|
| 2 | int compareTo(Object o)
Compares this String to another Object.
|
| 3 | int compareTo(String anotherString)
Compares two strings lexicographically.
|
| 4 | int compareToIgnoreCase(String str)
Compares two strings lexicographically, ignoring case differences.
|
| 5 | String concat(String str)
Concatenates the specified string to the end of this string.
|
| 6 | boolean contentEquals(StringBuffer sb)
Returns true if and only if this String represents the same sequence of characters as the specified StringBuffer.
|
| 7 | static String copyValueOf(char[] data)
Returns a String that represents the character sequence in the array specified.
|
| 8 | static String copyValueOf(char[] data, int offset, int count)
Returns a String that represents the character sequence in the array specified.
|
| 9 | boolean endsWith(String suffix)
Tests if this string ends with the specified suffix.
|
| 10 | boolean equals(Object anObject)
Compares this string to the specified object.
|
| 11 | boolean equalsIgnoreCase(String anotherString)
Compares this String to another String, ignoring case considerations.
|
| 12 | byte getBytes()
Encodes this String into a sequence of bytes using the platform's default charset, storing the result into a new byte array.
|
| 13 | byte[] getBytes(String charsetName)
Encodes this String into a sequence of bytes using the named charset, storing the result into a new byte array.
|
| 14 | void getChars(int srcBegin, int srcEnd, char[] dst, int dstBegin)
Copies characters from this string into the destination character array.
|
| 15 | int hashCode()
Returns a hash code for this string.
|
| 16 | int indexOf(int ch)
Returns the index within this string of the first occurrence of the specified character.
|
| 17 | int indexOf(int ch, int fromIndex)
Returns the index within this string of the first occurrence of the specified character, starting the search at the specified index.
|
| 18 | int indexOf(String str)
Returns the index within this string of the first occurrence of the specified substring.
|
| 19 | int indexOf(String str, int fromIndex)
Returns the index within this string of the first occurrence of the specified substring, starting at the specified index.
|
| 20 | String intern()
Returns a canonical representation for the string object.
|
| 21 | int lastIndexOf(int ch)
Returns the index within this string of the last occurrence of the specified character.
|
| 22 | int lastIndexOf(int ch, int fromIndex)
Returns the index within this string of the last occurrence of the specified character, searching backward starting at the specified index.
|
| 23 | int lastIndexOf(String str)
Returns the index within this string of the rightmost occurrence of the specified substring.
|
| 24 | int lastIndexOf(String str, int fromIndex)
Returns the index within this string of the last occurrence of the specified substring, searching backward starting at the specified index.
|
| 25 | int length()
Returns the length of this string.
|
| 26 | boolean matches(String regex)
Tells whether or not this string matches the given regular expression.
|
| 27 | boolean regionMatches(boolean ignoreCase, int toffset, String other, int ooffset, int len)
Tests if two string regions are equal.
|
| 28 | boolean regionMatches(int toffset, String other, int ooffset, int len)
Tests if two string regions are equal.
|
| 29 | String replace(char oldChar, char newChar)
Returns a new string resulting from replacing all occurrences of oldChar in this string with newChar.
|
| 30 | String replaceAll(String regex, String replacement
Replaces each substring of this string that matches the given regular expression with the given replacement.
|
| 31 | String replaceFirst(String regex, String replacement)
Replaces the first substring of this string that matches the given regular expression with the given replacement.
|
| 32 | String[] split(String regex)
Splits this string around matches of the given regular expression.
|
| 33 | String[] split(String regex, int limit)
Splits this string around matches of the given regular expression.
|
| 34 | boolean startsWith(String prefix)
Tests if this string starts with the specified prefix.
|
| 35 | boolean startsWith(String prefix, int toffset)
Tests if this string starts with the specified prefix beginning a specified index.
|
| 36 | CharSequence subSequence(int beginIndex, int endIndex)
Returns a new character sequence that is a subsequence of this sequence.
|
| 37 | String substring(int beginIndex)
Returns a new string that is a substring of this string.
|
| 38 | String substring(int beginIndex, int endIndex)
Returns a new string that is a substring of this string.
|
| 39 | char[] toCharArray()
Converts this string to a new character array.
|
| 40 | String toLowerCase()
Converts all of the characters in this String to lower case using the rules of the default locale.
|
| 41 | String toLowerCase(Locale locale)
Converts all of the characters in this String to lower case using the rules of the given Locale.
|
| 42 | String toString()
This object (which is already a string!) is itself returned.
|
| 43 | String toUpperCase()
Converts all of the characters in this String to upper case using the rules of the default locale.
|
| 44 | String toUpperCase(Locale locale)
Converts all of the characters in this String to upper case using the rules of the given Locale.
|
| 45 | String trim()
Returns a copy of the string, with leading and trailing whitespace omitted.
|
| 46 | static String valueOf(primitive data type x)
Returns the string representation of the passed data type argument.
|
assigning the reference of the array to the variable can be combined in one statement, as shown below −
dataType[] arrayRefVar = new dataType[arraySize];
Alternatively you can create arrays as follows −
dataType[] arrayRefVar = {value0, value1, ..., valuek};
The array elements are accessed through the index. Array indices are 0-based; that is, they start from 0 to arrayRefVar.length-1.
Example
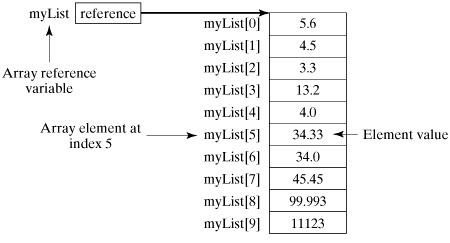
Following statement declares an array variable, myList, creates an array of 10 elements of double type and assigns its reference to myList −
double[] myList = new double[10];
Following picture represents array myList. Here, myList holds ten double values and the indices are from 0 to 9.
Processing Arrays
When processing array elements, we often use either for loop or foreach loop because all of the elements in an array are of the same type and the size of the array is known.
Example
Here is a complete example showing how to create, initialize, and process arrays −
public class TestArray {

   public static void main(String[] args) {
      double[] myList = {1.9, 2.9, 3.4, 3.5};

      // Print all the array elements
      for (int i = 0; i < myList.length; i++) {
         System.out.println(myList[i] + " ");
      }

      // Summing all elements
      double total = 0;
      for (int i = 0; i < myList.length; i++) {
         total += myList[i];
      }
      System.out.println("Total is " + total);

      // Finding the largest element
      double max = myList[0];
      for (int i = 1; i < myList.length; i++) {
         if (myList[i] > max) max = myList[i];
      }
      System.out.println("Max is " + max);
   }
}
This will produce the following result −
Output
1.9
2.9
3.4
3.5
Total is 11.7
Max is 3.5
The foreach Loops
JDK 1.5 introduced a new for loop known as foreach loop or enhanced for loop, which enables you to traverse the complete array sequentially without using an index variable.
Example
The following code displays all the elements in the array myList −
public class TestArray {

   public static void main(String[] args) {
      double[] myList = {1.9, 2.9, 3.4, 3.5};

      // Print all the array elements
      for (double element: myList) {
         System.out.println(element);
      }
   }
}
This will produce the following result −
Output
1.9
2.9
3.4
3.5
Passing Arrays to Methods
Just as you can pass primitive type values to methods, you can also pass arrays to methods. For example, the following method displays the elements in an int array −
Example
public static void printArray(int[] array) {
   for (int i = 0; i < array.length; i++) {
      System.out.print(array[i] + " ");
   }
}
You can invoke it by passing an array. For example, the following statement invokes the printArray method to display 3, 1, 2, 6, 4, and 2 −
Example
printArray(new int[]{3, 1, 2, 6, 4, 2});
Returning an Array from a Method
A method may also return an array. For example, the following method returns an array that is the reversal of another array −
Example
public static int[] reverse(int[] list) {
   int[] result = new int[list.length];

   for (int i = 0, j = result.length - 1; i < list.length; i++, j--) {
      result[j] = list[i];
   }
   return result;
}
The Arrays Class
The java.util.Arrays class contains various static methods for sorting and searching arrays, comparing arrays, and filling array elements. These methods are overloaded for all primitive types.
| Sr.No. | Method & Description |
|---|---|
| 1 |
public static int binarySearch(Object[] a, Object key)
Searches the specified array of Object ( Byte, Int , double, etc.) for the specified value using the binary search algorithm. The array must be sorted prior to making this call. This returns index of the search key, if it is contained in the list; otherwise, it returns ( – (insertion point + 1)).
|
| 2 |
public static boolean equals(long[] a, long[] a2)
Returns true if the two specified arrays of longs are equal to one another. Two arrays are considered equal if both arrays contain the same number of elements, and all corresponding pairs of elements in the two arrays are equal. This returns true if the two arrays are equal. Same method could be used by all other primitive data types (Byte, short, Int, etc.)
|
| 3 |
public static void fill(int[] a, int val)
Assigns the specified int value to each element of the specified array of ints. The same method could be used by all other primitive data types (Byte, short, Int, etc.)
|
| 4 |
public static void sort(Object[] a)
Sorts the specified array of objects into an ascending order, according to the natural ordering of its elements. The same method could be used by all other primitive data types ( Byte, short, Int, etc.)
|
Java - Date and Time
Java provides the Date class available in java.util package, this class encapsulates the current date and time.
The Date class supports two constructors as shown in the following table.
| Sr.No. | Constructor & Description |
|---|---|
| 1 |
Date( )
This constructor initializes the object with the current date and time.
|
| 2 |
Date(long millisec)
This constructor accepts an argument that equals the number of milliseconds that have elapsed since midnight, January 1, 1970.
|
Following are the methods of the date class.
| Sr.No. | Method & Description |
|---|---|
| 1 |
boolean after(Date date)
Returns true if the invoking Date object contains a date that is later than the one specified by date, otherwise, it returns false.
|
| 2 |
boolean before(Date date)
Returns true if the invoking Date object contains a date that is earlier than the one specified by date, otherwise, it returns false.
|
| 3 |
Object clone( )
Duplicates the invoking Date object.
|
| 4 |
int compareTo(Date date)
Compares the value of the invoking object with that of date. Returns 0 if the values are equal. Returns a negative value if the invoking object is earlier than date. Returns a positive value if the invoking object is later than date.
|
| 5 |
int compareTo(Object obj)
Operates identically to compareTo(Date) if obj is of class Date. Otherwise, it throws a ClassCastException.
|
| 6 |
boolean equals(Object date)
Returns true if the invoking Date object contains the same time and date as the one specified by date, otherwise, it returns false.
|
| 7 |
long getTime( )
Returns the number of milliseconds that have elapsed since January 1, 1970.
|
| 8 |
int hashCode( )
Returns a hash code for the invoking object.
|
| 9 |
void setTime(long time)
Sets the time and date as specified by time, which represents an elapsed time in milliseconds from midnight, January 1, 1970.
|
| 10 |
String toString( )
Converts the invoking Date object into a string and returns the result.
|
Getting Current Date and Time
This is a very easy method to get current date and time in Java. You can use a simple Date object with toString() method to print the current date and time as follows −
Example
import java.util.Date;
public class DateDemo {

   public static void main(String args[]) {
      // Instantiate a Date object
      Date date = new Date();

      // display time and date using toString()
      System.out.println(date.toString());
   }
}
This will produce the following result −
Output
on May 04 09:51:52 CDT 2009
Date Comparison
Following are the three ways to compare two dates −
- You can use getTime( ) to obtain the number of milliseconds that have elapsed since midnight, January 1, 1970, for both objects and then compare these two values.
- You can use the methods before( ), after( ), and equals( ). Because the 12th of the month comes before the 18th, for example, new Date(99, 2, 12).before(new Date (99, 2, 18)) returns true.
- You can use the compareTo( ) method, which is defined by the Comparable interface and implemented by Date.
Date Formatting Using SimpleDateFormat
SimpleDateFormat is a concrete class for formatting and parsing dates in a locale-sensitive manner. SimpleDateFormat allows you to start by choosing any user-defined patterns for date-time formatting.
Example
import java.util.*;
import java.text.*;

public class DateDemo {

   public static void main(String args[]) {
      Date dNow = new Date( );
      SimpleDateFormat ft =
      new SimpleDateFormat ("E yyyy.MM.dd 'at' hh:mm:ss a zzz");

      System.out.println("Current Date: " + ft.format(dNow));
   }
}
This will produce the following result −
Output
Current Date: Sun 2004.07.18 at 04:14:09 PM PDT
Simple DateFormat Format Codes
To specify the time format, use a time pattern string. In this pattern, all ASCII letters are reserved as pattern letters, which are defined as the following −
| Character | Description | Example |
|---|---|---|
| G | Era designator | AD |
| y | Year in four digits | 2001 |
| M | Month in year | July or 07 |
| d | Day in month | 10 |
| h | Hour in A.M./P.M. (1~12) | 12 |
| H | Hour in day (0~23) | 22 |
| m | Minute in hour | 30 |
| s | Second in minute | 55 |
| S | Millisecond | 234 |
| E | Day in week | Tuesday |
| D | Day in year | 360 |
| F | Day of week in month | 2 (second Wed. in July) |
| w | Week in year | 40 |
| W | Week in month | 1 |
| a | A.M./P.M. marker | PM |
| k | Hour in day (1~24) | 24 |
| K | Hour in A.M./P.M. (0~11) | 10 |
| z | Time zone | Eastern Standard Time |
| ' | Escape for text | Delimiter |
| " | Single quote | ` |
Date Formatting Using printf
Date and time formatting can be done very easily using printf method. You use a two-letter format, starting with t and ending in one of the letters of the table as shown in the following code.
Example
import java.util.Date;
public class DateDemo {

   public static void main(String args[]) {
      // Instantiate a Date object
      Date date = new Date();

      // display time and date
      String str = String.format("Current Date/Time : %tc", date );

      System.out.printf(str);
   }
}
This will produce the following result −
Output
Current Date/Time : Sat Dec 15 16:37:57 MST 2012
It would be a bit silly if you had to supply the date multiple times to format each part. For that reason, a format string can indicate the index of the argument to be formatted.
The index must immediately follow the % and it must be terminated by a $.
Example
import java.util.Date;
public class DateDemo {

   public static void main(String args[]) {
      // Instantiate a Date object
      Date date = new Date();

      // display time and date
      System.out.printf("%1$s %2$tB %2$td, %2$tY", "Due date:", date);
   }
}
This will produce the following result −
Output
Due date: February 09, 2004
Alternatively, you can use the < flag. It indicates that the same argument as in the preceding format specification should be used again.
Example
import java.util.Date;
public class DateDemo {

   public static void main(String args[]) {
      // Instantiate a Date object
      Date date = new Date();

      // display formatted date
      System.out.printf("%s %tB %<te, %<tY", "Due date:", date);
   }
}
This will produce the following result −
Output
Due date: February 09, 2004
Date and Time Conversion Characters
| Character | Description | Example |
|---|---|---|
| c | Complete date and time | Mon May 04 09:51:52 CDT 2009 |
| F | ISO 8601 date | 2004-02-09 |
| D | U.S. formatted date (month/day/year) | 02/09/2004 |
| T | 24-hour time | 18:05:19 |
| r | 12-hour time | 06:05:19 pm |
| R | 24-hour time, no seconds | 18:05 |
| Y | Four-digit year (with leading zeroes) | 2004 |
| y | Last two digits of the year (with leading zeroes) | 04 |
| C | First two digits of the year (with leading zeroes) | 20 |
| B | Full month name | February |
| b | Abbreviated month name | Feb |
| m | Two-digit month (with leading zeroes) | 02 |
| d | Two-digit day (with leading zeroes) | 03 |
| e | Two-digit day (without leading zeroes) | 9 |
| A | Full weekday name | Monday |
| a | Abbreviated weekday name | Mon |
| j | Three-digit day of year (with leading zeroes) | 069 |
| H | Two-digit hour (with leading zeroes), between 00 and 23 | 18 |
| k | Two-digit hour (without leading zeroes), between 0 and 23 | 18 |
| I | Two-digit hour (with leading zeroes), between 01 and 12 | 06 |
| l | Two-digit hour (without leading zeroes), between 1 and 12 | 6 |
| M | Two-digit minutes (with leading zeroes) | 05 |
| S | Two-digit seconds (with leading zeroes) | 19 |
| L | Three-digit milliseconds (with leading zeroes) | 047 |
| N | Nine-digit nanoseconds (with leading zeroes) | 047000000 |
| P | Uppercase morning or afternoon marker | PM |
| p | Lowercase morning or afternoon marker | pm |
| z | RFC 822 numeric offset from GMT | -0800 |
| Z | Time zone | PST |
| s | Seconds since 1970-01-01 00:00:00 GMT | 1078884319 |
| Q | Milliseconds since 1970-01-01 00:00:00 GMT | 1078884319047 |
There are other useful classes related to Date and time. For more details, you can refer to Java Standard documentation.
Parsing Strings into Dates
The SimpleDateFormat class has some additional methods, notably parse( ), which tries to parse a string according to the format stored in the given SimpleDateFormat object.
Example
import java.util.*;
import java.text.*;

public class DateDemo {

   public static void main(String args[]) {
      SimpleDateFormat ft = new SimpleDateFormat ("yyyy-MM-dd");
      String input = args.length == 0 ? "1818-11-11" : args[0];

      System.out.print(input + " Parses as ");
      Date t;
      try {
         t = ft.parse(input);
         System.out.println(t);
      } catch (ParseException e) {
         System.out.println("Unparseable using " + ft);
      }
   }
}
A sample run of the above program would produce the following result −
Output
1818-11-11 Parses as Wed Nov 11 00:00:00 EST 1818
Sleeping for a While
You can sleep for any period of time from one millisecond up to the lifetime of your computer. For example, the following program would sleep for 3 seconds −
Example
import java.util.*;
public class SleepDemo {

   public static void main(String args[]) {
      try {
         System.out.println(new Date( ) + "\n");
         Thread.sleep(5*60*10);
         System.out.println(new Date( ) + "\n");
      } catch (Exception e) {
         System.out.println("Got an exception!");
      }
   }
}
This will produce the following result −
Output
Sun May 03 18:04:41 GMT 2009
Sun May 03 18:04:51 GMT 2009
Measuring Elapsed Time
Sometimes, you may need to measure point in time in milliseconds. So let's re-write the above example once again −
Example
import java.util.*;
public class DiffDemo {

   public static void main(String args[]) {
      try {
         long start = System.currentTimeMillis( );
         System.out.println(new Date( ) + "\n");

         Thread.sleep(5*60*10);
         System.out.println(new Date( ) + "\n");

         long end = System.currentTimeMillis( );
         long diff = end - start;
         System.out.println("Difference is : " + diff);
      } catch (Exception e) {
         System.out.println("Got an exception!");
      }
   }
}
This will produce the following result −
Output
Sun May 03 18:16:51 GMT 2009
Sun May 03 18:16:57 GMT 2009
Difference is : 5993
GregorianCalendar Class
GregorianCalendar is a concrete implementation of a Calendar class that implements the normal Gregorian calendar with which you are familiar. We did not discuss Calendar class in this tutorial, you can look up standard Java documentation for this.
The getInstance( ) method of Calendar returns a GregorianCalendar initialized with the current date and time in the default locale and time zone. GregorianCalendar defines two fields: AD and BC. These represent the two eras defined by the Gregorian calendar.
There are also several constructors for GregorianCalendar objects −
| Sr.No. | Constructor & Description |
|---|---|
| 1 |
GregorianCalendar()
Constructs a default GregorianCalendar using the current time in the default time zone with the default locale.
|
| 2 |
GregorianCalendar(int year, int month, int date)
Constructs a GregorianCalendar with the given date set in the default time zone with the default locale.
|
| 3 |
GregorianCalendar(int year, int month, int date, int hour, int minute)
Constructs a GregorianCalendar with the given date and time set for the default time zone with the default locale.
|
| 4 |
GregorianCalendar(int year, int month, int date, int hour, int minute, int second)
Constructs a GregorianCalendar with the given date and time set for the default time zone with the default locale.
|
| 5 |
GregorianCalendar(Locale aLocale)
Constructs a GregorianCalendar based on the current time in the default time zone with the given locale.
|
| 6 |
GregorianCalendar(TimeZone zone)
Constructs a GregorianCalendar based on the current time in the given time zone with the default locale.
|
| 7 |
GregorianCalendar(TimeZone zone, Locale aLocale)
Constructs a GregorianCalendar based on the current time in the given time zone with the given locale.
|
Here is the list of few useful support methods provided by GregorianCalendar class −
| Sr.No. | Method & Description |
|---|---|
| 1 |
void add(int field, int amount)
Adds the specified (signed) amount of time to the given time field, based on the calendar's rules.
|
| 2 |
protected void computeFields()
Converts UTC as milliseconds to time field values.
|
| 3 |
protected void computeTime()
Overrides Calendar Converts time field values to UTC as milliseconds.
|
| 4 |
boolean equals(Object obj)
Compares this GregorianCalendar to an object reference.
|
| 5 |
int get(int field)
Gets the value for a given time field.
|
| 6 |
int getActualMaximum(int field)
Returns the maximum value that this field could have, given the current date.
|
| 7 |
int getActualMinimum(int field)
Returns the minimum value that this field could have, given the current date.
|
| 8 |
int getGreatestMinimum(int field)
Returns highest minimum value for the given field if varies.
|
| 9 |
Date getGregorianChange()
Gets the Gregorian Calendar change date.
|
| 10 |
int getLeastMaximum(int field)
Returns lowest maximum value for the given field if varies.
|
| 11 |
int getMaximum(int field)
Returns maximum value for the given field.
|
| 12 |
Date getTime()
Gets this Calendar's current time.
|
| 13 |
long getTimeInMillis()
Gets this Calendar's current time as a long.
|
| 14 |
TimeZone getTimeZone()
Gets the time zone.
|
| 15 |
int getMinimum(int field)
Returns minimum value for the given field.
|
| 16 |
int hashCode()
Overrides hashCode.
|
| 17 |
boolean isLeapYear(int year)
Determines if the given year is a leap year.
|
| 18 |
void roll(int field, boolean up)
Adds or subtracts (up/down) a single unit of time on the given time field without changing larger fields.
|
| 19 |
void set(int field, int value)
Sets the time field with the given value.
|
| 20 |
void set(int year, int month, int date)
Sets the values for the fields year, month, and date.
|
| 21 |
void set(int year, int month, int date, int hour, int minute)
Sets the values for the fields year, month, date, hour, and minute.
|
| 22 |
void set(int year, int month, int date, int hour, int minute, int second)
Sets the values for the fields year, month, date, hour, minute, and second.
|
| 23 |
void setGregorianChange(Date date)
Sets the GregorianCalendar change date.
|
| 24 |
void setTime(Date date)
Sets this Calendar's current time with the given Date.
|
| 25 |
void setTimeInMillis(long millis)
Sets this Calendar's current time from the given long value.
|
| 26 |
void setTimeZone(TimeZone value)
Sets the time zone with the given time zone value.
|
| 27 |
String toString()
Returns a string representation of this calendar.
|
Example
import java.util.*;
public class GregorianCalendarDemo {

   public static void main(String args[]) {
      String months[] = {"Jan", "Feb", "Mar", "Apr", "May", "Jun", "Jul", "Aug", "Sep",
         "Oct", "Nov", "Dec"};

      int year;
      // Create a Gregorian calendar initialized
      // with the current date and time in the
      // default locale and timezone.

      GregorianCalendar gcalendar = new GregorianCalendar();

      // Display current time and date information.
      System.out.print("Date: ");
      System.out.print(months[gcalendar.get(Calendar.MONTH)]);
      System.out.print(" " + gcalendar.get(Calendar.DATE) + " ");
      System.out.println(year = gcalendar.get(Calendar.YEAR));
      System.out.print("Time: ");
      System.out.print(gcalendar.get(Calendar.HOUR) + ":");
      System.out.print(gcalendar.get(Calendar.MINUTE) + ":");
      System.out.println(gcalendar.get(Calendar.SECOND));

      // Test if the current year is a leap year
      if(gcalendar.isLeapYear(year)) {
         System.out.println("The current year is a leap year");
      }else {
         System.out.println("The current year is not a leap year");
      }
   }
}
This will produce the following result −
Output
Date: Apr 22 2009
Time: 11:25:27
The current year is not a leap year
For a complete list of constant available in Calendar class, you can refer the standard Java documentation.
Java - Regular Expressions
Java provides the java.util.regex package for pattern matching with regular expressions. Java regular expressions are very similar to the Perl programming language and very easy to learn.
A regular expression is a special sequence of characters that helps you match or find other strings or sets of strings, using a specialized syntax held in a pattern. They can be used to search, edit, or manipulate text and data.
The java.util.regex package primarily consists of the following three classes −
- Pattern Class − A Pattern object is a compiled representation of a regular expression. The Pattern class provides no public constructors. To create a pattern, you must first invoke one of its public static compile() methods, which will then return a Pattern object. These methods accept a regular expression as the first argument.
- Matcher Class − A Matcher object is the engine that interprets the pattern and performs match operations against an input string. Like the Pattern class, Matcher defines no public constructors. You obtain a Matcher object by invoking the matcher() method on a Pattern object.
- PatternSyntaxException − A PatternSyntaxException object is an unchecked exception that indicates a syntax error in a regular expression pattern.
Capturing Groups
Capturing groups are a way to treat multiple characters as a single unit. They are created by placing the characters to be grouped inside a set of parentheses. For example, the regular expression (dog) creates a single group containing the letters "d", "o", and "g".
Capturing groups are numbered by counting their opening parentheses from the left to the right. In the expression ((A)(B(C))), for example, there are four such groups −
- ((A)(B(C)))
- (A)
- (B(C))
- (C)
To find out how many groups are present in the expression, call the groupCount method on a matcher object. The groupCount method returns an int showing the number of capturing groups present in the matcher's pattern.
There is also a special group, group 0, which always represents the entire expression. This group is not included in the total reported by groupCount.
Example
Following example illustrates how to find a digit string from the given alphanumeric string −
import java.util.regex.Matcher;
import java.util.regex.Pattern;

public class RegexMatches {

   public static void main( String args[] ) {
      // String to be scanned to find the pattern.
      String line = "This order was placed for QT3000! OK?";
      String pattern = "(.*)(\\d+)(.*)";

      // Create a Pattern object
      Pattern r = Pattern.compile(pattern);

      // Now create matcher object.
      Matcher m = r.matcher(line);
      if (m.find( )) {
         System.out.println("Found value: " + m.group(0) );
         System.out.println("Found value: " + m.group(1) );
         System.out.println("Found value: " + m.group(2) );
      }else {
         System.out.println("NO MATCH");
      }
   }
}
This will produce the following result −
Output
Found value: This order was placed for QT3000! OK?
Found value: This order was placed for QT300
Found value: 0
Regular Expression Syntax
Here is the table listing down all the regular expression metacharacter syntax available in Java −
| Subexpression | Matches |
|---|---|
| ^ | Matches the beginning of the line. |
| $ | Matches the end of the line. |
| . | Matches any single character except newline. Using m option allows it to match the newline as well. |
| [...] | Matches any single character in brackets. |
| [^...] | Matches any single character not in brackets. |
| \A | Beginning of the entire string. |
| \z | End of the entire string. |
| \Z | End of the entire string except allowable final line terminator. |
| re* | Matches 0 or more occurrences of the preceding expression. |
| re+ | Matches 1 or more of the previous thing. |
| re? | Matches 0 or 1 occurrence of the preceding expression. |
| re{ n} | Matches exactly n number of occurrences of the preceding expression. |
| re{ n,} | Matches n or more occurrences of the preceding expression. |
| re{ n, m} | Matches at least n and at most m occurrences of the preceding expression. |
| a| b | Matches either a or b. |
| (re) | Groups regular expressions and remembers the matched text. |
| (?: re) | Groups regular expressions without remembering the matched text. |
| (?> re) | Matches the independent pattern without backtracking. |
| \w | Matches the word characters. |
| \W | Matches the nonword characters. |
| \s | Matches the whitespace. Equivalent to [\t\n\r\f]. |
| \S | Matches the nonwhitespace. |
| \d | Matches the digits. Equivalent to [0-9]. |
| \D | Matches the nondigits. |
| \A | Matches the beginning of the string. |
| \Z | Matches the end of the string. If a newline exists, it matches just before newline. |
| \z | Matches the end of the string. |
| \G | Matches the point where the last match finished. |
| \n | Back-reference to capture group number "n". |
| \b | Matches the word boundaries when outside the brackets. Matches the backspace (0x08) when inside the brackets. |
| \B | Matches the nonword boundaries. |
| \n, \t, etc. | Matches newlines, carriage returns, tabs, etc. |
| \Q | Escape (quote) all characters up to \E. |
| \E | Ends quoting begun with \Q. |
Methods of the Matcher Class
Here is a list of useful instance methods −
Index Methods
Index methods provide useful index values that show precisely where the match was found in the input string −
| Sr.No. | Method & Description |
|---|---|
| 1 |
public int start()
Returns the start index of the previous match.
|
| 2 |
public int start(int group)
Returns the start index of the subsequence captured by the given group during the previous match operation.
|
| 3 |
public int end()
Returns the offset after the last character matched.
|
| 4 |
public int end(int group)
Returns the offset after the last character of the subsequence captured by the given group during the previous match operation.
|
Study Methods
Study methods review the input string and return a Boolean indicating whether or not the pattern is found −
| Sr.No. | Method & Description |
|---|---|
| 1 |
public boolean lookingAt()
Attempts to match the input sequence, starting at the beginning of the region, against the pattern.
|
| 2 |
public boolean find()
Attempts to find the next subsequence of the input sequence that matches the pattern.
|
| 3 |
public boolean find(int start)
Resets this matcher and then attempts to find the next subsequence of the input sequence that matches the pattern, starting at the specified index.
|
| 4 |
public boolean matches()
Attempts to match the entire region against the pattern.
|
Replacement Methods
Replacement methods are useful methods for replacing text in an input string −
| Sr.No. | Method & Description |
|---|---|
| 1 |
public Matcher appendReplacement(StringBuffer sb, String replacement)
Implements a non-terminal append-and-replace step.
|
| 2 |
public StringBuffer appendTail(StringBuffer sb)
Implements a terminal append-and-replace step.
|
| 3 |
public String replaceAll(String replacement)
Replaces every subsequence of the input sequence that matches the pattern with the given replacement string.
|
| 4 |
public String replaceFirst(String replacement)
Replaces the first subsequence of the input sequence that matches the pattern with the given replacement string.
|
| 5 |
public static String quoteReplacement(String s)
Returns a literal replacement String for the specified String. This method produces a String that will work as a literal replacement s in the appendReplacement method of the Matcher class.
|
The start and end Methods
Following is the example that counts the number of times the word "cat" appears in the input string −
Example
import java.util.regex.Matcher;
import java.util.regex.Pattern;

public class RegexMatches {

   private static final String REGEX = "\\bcat\\b";
   private static final String INPUT = "cat cat cat cattie cat";

   public static void main( String args[] ) {
      Pattern p = Pattern.compile(REGEX);
      Matcher m = p.matcher(INPUT);   // get a matcher object
      int count = 0;

      while(m.find()) {
         count++;
         System.out.println("Match number "+count);
         System.out.println("start(): "+m.start());
         System.out.println("end(): "+m.end());
      }
   }
}
This will produce the following result −
Output
Match number 1
start(): 0
end(): 3
Match number 2
start(): 4
end(): 7
Match number 3
start(): 8
end(): 11
Match number 4
start(): 19
end(): 22
You can see that this example uses word boundaries to ensure that the letters "c" "a" "t" are not merely a substring in a longer word. It also gives some useful information about where in the input string the match has occurred.
The start method returns the start index of the subsequence captured by the given group during the previous match operation, and the end returns the index of the last character matched, plus one.
The matches and lookingAt Methods
The matches and lookingAt methods both attempt to match an input sequence against a pattern. The difference, however, is that matches requires the entire input sequence to be matched, while lookingAt does not.
Both methods always start at the beginning of the input string. Here is the example explaining the functionality −
Example
import java.util.regex.Matcher;
import java.util.regex.Pattern;

public class RegexMatches {

   private static final String REGEX = "foo";
   private static final String INPUT = "fooooooooooooooooo";
   private static Pattern pattern;
   private static Matcher matcher;

   public static void main( String args[] ) {
      pattern = Pattern.compile(REGEX);
      matcher = pattern.matcher(INPUT);

      System.out.println("Current REGEX is: "+REGEX);
      System.out.println("Current INPUT is: "+INPUT);

      System.out.println("lookingAt(): "+matcher.lookingAt());
      System.out.println("matches(): "+matcher.matches());
   }
}
This will produce the following result −
Output
Current REGEX is: foo
Current INPUT is: fooooooooooooooooo
lookingAt(): true
matches(): false
The replaceFirst and replaceAll Methods
The replaceFirst and replaceAll methods replace the text that matches a given regular expression. As their names indicate, replaceFirst replaces the first occurrence, and replaceAll replaces all occurrences.
Here is the example explaining the functionality −
Example
import java.util.regex.Matcher;
import java.util.regex.Pattern;

public class RegexMatches {

   private static String REGEX = "dog";
   private static String INPUT = "The dog says meow. " + "All dogs say meow.";
   private static String REPLACE = "cat";

   public static void main(String[] args) {
      Pattern p = Pattern.compile(REGEX);

      // get a matcher object
      Matcher m = p.matcher(INPUT);
      INPUT = m.replaceAll(REPLACE);
      System.out.println(INPUT);
   }
}
This will produce the following result −
Output
The cat says meow. All cats say meow.
The appendReplacement and appendTail Methods
The Matcher class also provides appendReplacement and appendTail methods for text replacement.
Here is the example explaining the functionality −
Example
import java.util.regex.Matcher;
import java.util.regex.Pattern;

public class RegexMatches {

   private static String REGEX = "a*b";
   private static String INPUT = "aabfooaabfooabfoob";
   private static String REPLACE = "-";
   public static void main(String[] args) {

      Pattern p = Pattern.compile(REGEX);

      // get a matcher object
      Matcher m = p.matcher(INPUT);
      StringBuffer sb = new StringBuffer();
      while(m.find()) {
         m.appendReplacement(sb, REPLACE);
      }
      m.appendTail(sb);
      System.out.println(sb.toString());
   }
}
This will produce the following result −
Output
-foo-foo-foo-
PatternSyntaxException Class Methods
A PatternSyntaxException is an unchecked exception that indicates a syntax error in a regular expression pattern. The PatternSyntaxException class provides the following methods to help you determine what went wrong −
| Sr.No. | Method & Description |
|---|---|
| 1 |
public String getDescription()
Retrieves the description of the error.
|
| 2 |
public int getIndex()
Retrieves the error index.
|
| 3 |
public String getPattern()
Retrieves the erroneous regular expression pattern.
|
| 4 |
public String getMessage()
Returns a multi-line string containing the description of the syntax error and its index, the erroneous regular expression pattern, and a visual indication of the error index within the pattern.
|
Java - Methods
A Java method is a collection of statements that are grouped together to perform an operation. When you call the System.out.println() method, for example, the system actually executes several statements in order to display a message on the console.
Now you will learn how to create your own methods with or without return values, invoke a method with or without parameters, and apply method abstraction in the program design.
Creating Method
Considering the following example to explain the syntax of a method −
Syntax
public static int methodName(int a, int b) {
   // body
}
Here,
- public static − modifier
- int − return type
- methodName − name of the method
- a, b − formal parameters
- int a, int b − list of parameters
Method definition consists of a method header and a method body. The same is shown in the following syntax −
Syntax
modifier returnType nameOfMethod (Parameter List) {
   // method body
}
The syntax shown above includes −
- modifier − It defines the access type of the method and it is optional to use.
- returnType − Method may return a value.
- nameOfMethod − This is the method name. The method signature consists of the method name and the parameter list.
- Parameter List − The list of parameters, it is the type, order, and number of parameters of a method. These are optional, method may contain zero parameters.
- method body − The method body defines what the method does with the statements.
Example
Here is the source code of the above defined method called min(). This method takes two parameters num1 and num2 and returns the maximum between the two −
/** the snippet returns the minimum between two numbers */

public static int minFunction(int n1, int n2) {
   int min;
   if (n1 > n2)
      min = n2;
   else
      min = n1;

   return min;
}
Method Calling
For using a method, it should be called. There are two ways in which a method is called i.e., method returns a value or returning nothing (no return value).
The process of method calling is simple. When a program invokes a method, the program control gets transferred to the called method. This called method then returns control to the caller in two conditions, when −
- the return statement is executed.
- it reaches the method ending closing brace.
The methods returning void is considered as call to a statement. Lets consider an example −
System.out.println("This is tutorialspoint.com!");
The method returning value can be understood by the following example −
int result = sum(6, 9);
Following is the example to demonstrate how to define a method and how to call it −
Example
public class ExampleMinNumber {

   public static void main(String[] args) {
      int a = 11;
      int b = 6;
      int c = minFunction(a, b);
      System.out.println("Minimum Value = " + c);
   }

   /** returns the minimum of two numbers */
   public static int minFunction(int n1, int n2) {
      int min;
      if (n1 > n2)
         min = n2;
      else
         min = n1;

      return min;
   }
}
This will produce the following result −
Output
Minimum value = 6
The void Keyword
The void keyword allows us to create methods which do not return a value. Here, in the following example we're considering a void method methodRankPoints. This method is a void method, which does not return any value. Call to a void method must be a statement i.e. methodRankPoints(255.7);. It is a Java statement which ends with a semicolon as shown in the following example.
Example
public class ExampleVoid {

   public static void main(String[] args) {
      methodRankPoints(255.7);
   }

   public static void methodRankPoints(double points) {
      if (points >= 202.5) {
         System.out.println("Rank:A1");
      }else if (points >= 122.4) {
         System.out.println("Rank:A2");
      }else {
         System.out.println("Rank:A3");
      }
   }
}
This will produce the following result −
Output
Rank:A1
Passing Parameters by Value
While working under calling process, arguments is to be passed. These should be in the same order as their respective parameters in the method specification. Parameters can be passed by value or by reference.
Passing Parameters by Value means calling a method with a parameter. Through this, the argument value is passed to the parameter.
Example
The following program shows an example of passing parameter by value. The values of the arguments remains the same even after the method invocation.
public class swappingExample {

   public static void main(String[] args) {
      int a = 30;
      int b = 45;
      System.out.println("Before swapping, a = " + a + " and b = " + b);

      // Invoke the swap method
      swapFunction(a, b);
      System.out.println("\n**Now, Before and After swapping values will be same here**:");
      System.out.println("After swapping, a = " + a + " and b is " + b);
   }

   public static void swapFunction(int a, int b) {
      System.out.println("Before swapping(Inside), a = " + a + " b = " + b);

      // Swap n1 with n2
      int c = a;
      a = b;
      b = c;
      System.out.println("After swapping(Inside), a = " + a + " b = " + b);
   }
}
This will produce the following result −
Output
Before swapping, a = 30 and b = 45
Before swapping(Inside), a = 30 b = 45
After swapping(Inside), a = 45 b = 30

**Now, Before and After swapping values will be same here**:
After swapping, a = 30 and b is 45
Method Overloading
When a class has two or more methods by the same name but different parameters, it is known as method overloading. It is different from overriding. In overriding, a method has the same method name, type, number of parameters, etc.
Let’s consider the example discussed earlier for finding minimum numbers of integer type. If, let’s say we want to find the minimum number of double type. Then the concept of overloading will be introduced to create two or more methods with the same name but different parameters.
The following example explains the same −
Example
public class ExampleOverloading {

   public static void main(String[] args) {
      int a = 11;
      int b = 6;
      double c = 7.3;
      double d = 9.4;
      int result1 = minFunction(a, b);

      // same function name with different parameters
      double result2 = minFunction(c, d);
      System.out.println("Minimum Value = " + result1);
      System.out.println("Minimum Value = " + result2);
   }

   // for integer
   public static int minFunction(int n1, int n2) {
      int min;
      if (n1 > n2)
         min = n2;
      else
         min = n1;

      return min;
   }

   // for double
   public static double minFunction(double n1, double n2) {
     double min;
      if (n1 > n2)
         min = n2;
      else
         min = n1;

      return min;
   }
}
This will produce the following result −
Output
Minimum Value = 6
Minimum Value = 7.3
Overloading methods makes program readable. Here, two methods are given by the same name but with different parameters. The minimum number from integer and double types is the result.
Using Command-Line Arguments
Sometimes you will want to pass some information into a program when you run it. This is accomplished by passing command-line arguments to main( ).
A command-line argument is the information that directly follows the program's name on the command line when it is executed. To access the command-line arguments inside a Java program is quite easy. They are stored as strings in the String array passed to main( ).
Example
The following program displays all of the command-line arguments that it is called with −
public class CommandLine {

   public static void main(String args[]) {
      for(int i = 0; i<args.length; i++) {
         System.out.println("args[" + i + "]: " +  args[i]);
      }
   }
}
Try executing this program as shown here −
$java CommandLine this is a command line 200 -100
This will produce the following result −
Output
args[0]: this
args[1]: is
args[2]: a
args[3]: command
args[4]: line
args[5]: 200
args[6]: -100
The this keyword
this is a keyword in Java which is used as a reference to the object of the current class, with in an instance method or a constructor. Using this you can refer the members of a class such as constructors, variables and methods.
Note − The keyword this is used only within instance methods or constructors
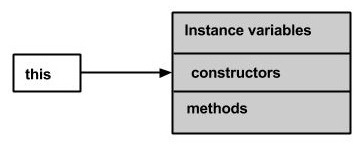
In general, the keyword this is used to −
- Differentiate the instance variables from local variables if they have same names, within a constructor or a method.
class Student {
   int age;
   Student(int age) {
      this.age = age;
   }
}
- Call one type of constructor (parametrized constructor or default) from other in a class. It is known as explicit constructor invocation.
class Student {
   int age
   Student() {
      this(20);
   }

   Student(int age) {
      this.age = age;
   }
}
Example
Here is an example that uses this keyword to access the members of a class. Copy and paste the following program in a file with the name, This_Example.java.
public class This_Example {
   // Instance variable num
   int num = 10;

   This_Example() {
      System.out.println("This is an example program on keyword this");
   }

   This_Example(int num) {
      // Invoking the default constructor
      this();

      // Assigning the local variable num to the instance variable num
      this.num = num;
   }

   public void greet() {
      System.out.println("Hi Welcome to Tutorialspoint");
   }

   public void print() {
      // Local variable num
      int num = 20;

      // Printing the local variable
      System.out.println("value of local variable num is : "+num);

      // Printing the instance variable
      System.out.println("value of instance variable num is : "+this.num);

      // Invoking the greet method of a class
      this.greet();
   }

   public static void main(String[] args) {
      // Instantiating the class
      This_Example obj1 = new This_Example();

      // Invoking the print method
      obj1.print();

      // Passing a new value to the num variable through parametrized constructor
      This_Example obj2 = new This_Example(30);

      // Invoking the print method again
      obj2.print();
   }
}
This will produce the following result −
Output
This is an example program on keyword this
value of local variable num is : 20
value of instance variable num is : 10
Hi Welcome to Tutorialspoint
This is an example program on keyword this
value of local variable num is : 20
value of instance variable num is : 30
Hi Welcome to Tutorialspoint
Variable Arguments(var-args)
JDK 1.5 enables you to pass a variable number of arguments of the same type to a method. The parameter in the method is declared as follows −
typeName... parameterName
In the method declaration, you specify the type followed by an ellipsis (...). Only one variable-length parameter may be specified in a method, and this parameter must be the last parameter. Any regular parameters must precede it.
Example
public class VarargsDemo {

   public static void main(String args[]) {
      // Call method with variable args
    printMax(34, 3, 3, 2, 56.5);
      printMax(new double[]{1, 2, 3});
   }

   public static void printMax( double... numbers) {
      if (numbers.length == 0) {
         System.out.println("No argument passed");
         return;
      }

      double result = numbers[0];

      for (int i = 1; i <  numbers.length; i++)
      if (numbers[i] >  result)
      result = numbers[i];
      System.out.println("The max value is " + result);
   }
}
This will produce the following result −
Output
The max value is 56.5
The max value is 3.0
The finalize( ) Method
It is possible to define a method that will be called just before an object's final destruction by the garbage collector. This method is called finalize( ), and it can be used to ensure that an object terminates cleanly.
For example, you might use finalize( ) to make sure that an open file owned by that object is closed.
To add a finalizer to a class, you simply define the finalize( ) method. The Java runtime calls that method whenever it is about to recycle an object of that class.
Inside the finalize( ) method, you will specify those actions that must be performed before an object is destroyed.
The finalize( ) method has this general form −
protected void finalize( ) {
   // finalization code here
}
Here, the keyword protected is a specifier that prevents access to finalize( ) by code defined outside its class.
This means that you cannot know when or even if finalize( ) will be executed. For example, if your program ends before garbage collection occurs, finalize( ) will not execute.
Java - Files and I/O
The java.io package contains nearly every class you might ever need to perform input and output (I/O) in Java. All these streams represent an input source and an output destination. The stream in the java.io package supports many data such as primitives, object, localized characters, etc.
Stream
A stream can be defined as a sequence of data. There are two kinds of Streams −
- InPutStream − The InputStream is used to read data from a source.
- OutPutStream − The OutputStream is used for writing data to a destination.

Java provides strong but flexible support for I/O related to files and networks but this tutorial covers very basic functionality related to streams and I/O. We will see the most commonly used examples one by one −
Byte Streams
Java byte streams are used to perform input and output of 8-bit bytes. Though there are many classes related to byte streams but the most frequently used classes are, FileInputStream and FileOutputStream. Following is an example which makes use of these two classes to copy an input file into an output file −
Example
import java.io.*;
public class CopyFile {

   public static void main(String args[]) throws IOException {
      FileInputStream in = null;
      FileOutputStream out = null;

      try {
         in = new FileInputStream("input.txt");
         out = new FileOutputStream("output.txt");

         int c;
         while ((c = in.read()) != -1) {
            out.write(c);
         }
      }finally {
         if (in != null) {
            in.close();
         }
         if (out != null) {
            out.close();
         }
      }
   }
}
Now let's have a file input.txt with the following content −
This is test for copy file.
As a next step, compile the above program and execute it, which will result in creating output.txt file with the same content as we have in input.txt. So let's put the above code in CopyFile.java file and do the following −
$javac CopyFile.java
$java CopyFile
Character Streams
Java Byte streams are used to perform input and output of 8-bit bytes, whereas Java Character streams are used to perform input and output for 16-bit unicode. Though there are many classes related to character streams but the most frequently used classes are, FileReader and FileWriter. Though internally FileReader uses FileInputStream and FileWriter uses FileOutputStream but here the major difference is that FileReader reads two bytes at a time and FileWriter writes two bytes at a time.
We can re-write the above example, which makes the use of these two classes to copy an input file (having unicode characters) into an output file −
Example
import java.io.*;
public class CopyFile {

   public static void main(String args[]) throws IOException {
      FileReader in = null;
      FileWriter out = null;

      try {
         in = new FileReader("input.txt");
         out = new FileWriter("output.txt");

         int c;
         while ((c = in.read()) != -1) {
            out.write(c);
         }
      }finally {
         if (in != null) {
            in.close();
         }
         if (out != null) {
            out.close();
         }
      }
   }
}
Now let's have a file input.txt with the following content −
This is test for copy file.
As a next step, compile the above program and execute it, which will result in creating output.txt file with the same content as we have in input.txt. So let's put the above code in CopyFile.java file and do the following −
$javac CopyFile.java
$java CopyFile
Standard Streams
All the programming languages provide support for standard I/O where the user's program can take input from a keyboard and then produce an output on the computer screen. If you are aware of C or C++ programming languages, then you must be aware of three standard devices STDIN, STDOUT and STDERR. Similarly, Java provides the following three standard streams −
- Standard Input − This is used to feed the data to user's program and usually a keyboard is used as standard input stream and represented as System.in.
- Standard Output − This is used to output the data produced by the user's program and usually a computer screen is used for standard output stream and represented as System.out.
- Standard Error − This is used to output the error data produced by the user's program and usually a computer screen is used for standard error stream and represented as System.err.
Following is a simple program, which creates InputStreamReader to read standard input stream until the user types a "q" −
Example
import java.io.*;
public class ReadConsole {

   public static void main(String args[]) throws IOException {
      InputStreamReader cin = null;

      try {
         cin = new InputStreamReader(System.in);
         System.out.println("Enter characters, 'q' to quit.");
         char c;
         do {
            c = (char) cin.read();
            System.out.print(c);
         } while(c != 'q');
      }finally {
         if (cin != null) {
            cin.close();
         }
      }
   }
}
Let's keep the above code in ReadConsole.java file and try to compile and execute it as shown in the following program. This program continues to read and output the same character until we press 'q' −
$javac ReadConsole.java
$java ReadConsole
Enter characters, 'q' to quit.
1
1
e
e
q
q
Reading and Writing Files
As described earlier, a stream can be defined as a sequence of data. The InputStream is used to read data from a source and the OutputStream is used for writing data to a destination.
Here is a hierarchy of classes to deal with Input and Output streams.
The two important streams are FileInputStream and FileOutputStream, which would be discussed in this tutorial.
FileInputStream
This stream is used for reading data from the files. Objects can be created using the keyword new and there are several types of constructors available.
Following constructor takes a file name as a string to create an input stream object to read the file −
InputStream f = new FileInputStream("C:/java/hello");
Following constructor takes a file object to create an input stream object to read the file. First we create a file object using File() method as follows −
File f = new File("C:/java/hello");
InputStream f = new FileInputStream(f);
Once you have InputStream object in hand, then there is a list of helper methods which can be used to read to stream or to do other operations on the stream.
| Sr.No. | Method & Description |
|---|---|
| 1 |
public void close() throws IOException{}
This method closes the file output stream. Releases any system resources associated with the file. Throws an IOException.
|
| 2 |
protected void finalize()throws IOException {}
This method cleans up the connection to the file. Ensures that the close method of this file output stream is called when there are no more references to this stream. Throws an IOException.
|
| 3 |
public int read(int r)throws IOException{}
This method reads the specified byte of data from the InputStream. Returns an int. Returns the next byte of data and -1 will be returned if it's the end of the file.
|
| 4 |
public int read(byte[] r) throws IOException{}
This method reads r.length bytes from the input stream into an array. Returns the total number of bytes read. If it is the end of the file, -1 will be returned.
|
| 5 |
public int available() throws IOException{}
Gives the number of bytes that can be read from this file input stream. Returns an int.
|
There are other important input streams available, for more detail you can refer to the following links −
FileOutputStream
FileOutputStream is used to create a file and write data into it. The stream would create a file, if it doesn't already exist, before opening it for output.
Here are two constructors which can be used to create a FileOutputStream object.
Following constructor takes a file name as a string to create an input stream object to write the file −
OutputStream f = new FileOutputStream("C:/java/hello")
Following constructor takes a file object to create an output stream object to write the file. First, we create a file object using File() method as follows −
File f = new File("C:/java/hello");
OutputStream f = new FileOutputStream(f);
Once you have OutputStream object in hand, then there is a list of helper methods, which can be used to write to stream or to do other operations on the stream.
| Sr.No. | Method & Description |
|---|---|
| 1 |
public void close() throws IOException{}
This method closes the file output stream. Releases any system resources associated with the file. Throws an IOException.
|
| 2 |
protected void finalize()throws IOException {}
This method cleans up the connection to the file. Ensures that the close method of this file output stream is called when there are no more references to this stream. Throws an IOException.
|
| 3 |
public void write(int w)throws IOException{}
This methods writes the specified byte to the output stream.
|
| 4 |
public void write(byte[] w)
Writes w.length bytes from the mentioned byte array to the OutputStream.
|
There are other important output streams available, for more detail you can refer to the following links −
Example
Following is the example to demonstrate InputStream and OutputStream −
import java.io.*;
public class fileStreamTest {

   public static void main(String args[]) {

      try {
         byte bWrite [] = {11,21,3,40,5};
         OutputStream os = new FileOutputStream("test.txt");
         for(int x = 0; x < bWrite.length ; x++) {
            os.write( bWrite[x] );   // writes the bytes
         }
         os.close();

         InputStream is = new FileInputStream("test.txt");
         int size = is.available();

         for(int i = 0; i < size; i++) {
            System.out.print((char)is.read() + "  ");
         }
         is.close();
      } catch (IOException e) {
         System.out.print("Exception");
      }
   }
}
The above code would create file test.txt and would write given numbers in binary format. Same would be the output on the stdout screen.
File Navigation and I/O
There are several other classes that we would be going through to get to know the basics of File Navigation and I/O.
Directories in Java
A directory is a File which can contain a list of other files and directories. You use File object to create directories, to list down files available in a directory. For complete detail, check a list of all the methods which you can call on File object and what are related to directories.
Creating Directories
There are two useful File utility methods, which can be used to create directories −
- The mkdir( ) method creates a directory, returning true on success and false on failure. Failure indicates that the path specified in the File object already exists, or that the directory cannot be created because the entire path does not exist yet.
- The mkdirs() method creates both a directory and all the parents of the directory.
Following example creates "/tmp/user/java/bin" directory −
Example
import java.io.File;
public class CreateDir {

   public static void main(String args[]) {
      String dirname = "/tmp/user/java/bin";
      File d = new File(dirname);

      // Create directory now.
      d.mkdirs();
   }
}
Compile and execute the above code to create "/tmp/user/java/bin".
Note − Java automatically takes care of path separators on UNIX and Windows as per conventions. If you use a forward slash (/) on a Windows version of Java, the path will still resolve correctly.
Listing Directories
You can use list( ) method provided by File object to list down all the files and directories available in a directory as follows −
Example
import java.io.File;
public class ReadDir {

   public static void main(String[] args) {
      File file = null;
      String[] paths;

      try {
         // create new file object
         file = new File("/tmp");

         // array of files and directory
         paths = file.list();

         // for each name in the path array
         for(String path:paths) {
            // prints filename and directory name
            System.out.println(path);
         }
      } catch (Exception e) {
         // if any error occurs
         e.printStackTrace();
      }
   }
}
This will produce the following result based on the directories and files available in your /tmp directory −
Output
test1.txt
test2.txt
ReadDir.java
ReadDir.class
तो आज के लिए बस इतना ही आगे की जानकारी मिलने पर हम आपको जरूर बताएंगे। .
नमस्कार। ........


nice blog
ReplyDelete